Blogs
The latest cybersecurity trends, best practices, security vulnerabilities, and more
A Door Isn’t a Door When It’s Ajar - Part 1
By Trellix · August 11, 2022
This story was also written by Steve Povolny and Sam Quinn
Contents
Executive Summary
Target Selection
What is it?
Reconnaissance & Standard Operations
Recon
Standard Operations
Hardware Hacking
Hardware Hacking Shopping List
Hardware debugging with UART
Hardware debugging with JTAG
Modifying UBoot Bootdelay
Disassembly and Debugging
Root Shell Video Demo
This blog is the first of a multi-part technical series focused on vulnerability discovery in a widely used access control system. It describes our research journey from target acquisition all the way through exploitation, beginning with the vendor and product selection and a deep dive into the hardware hacking techniques.
Executive Summary
Critical infrastructure is the backbone of our entire global infrastructure. It represents both an undeniably enticing and often unforgivably vulnerable attack surface for nation-state actors to target. The last few years alone have demonstrated this in glaring detail; highly publicized attacks against national pipelines, energy grid, water treatment systems, telecommunications providers and many more highlight the increasing boldness of attackers across the globe.
Access control systems represent a unique threat vector, serving as one of the few barriers between the digital and physical realm, and often overly relied upon for protection of highly sensitive assets. This vector in industrial control systems (ICS) and building automation systems (BAS) has been overlooked by both researchers and adversaries. This gap is fundamental to our decision to focus research in this area.
Our research over the course of this project led to the discovery and responsible disclosure of 8 unique vulnerabilities, 4 of which were unauthenticated remote code execution in the latest version of the firmware at the time. The following table represents these findings.
| CVE | Detail Summary | Mercury Firmware Version | CVSS Score |
|---|---|---|---|
| CVE-2022-31479 | Unauthenticated command injection | <=1.291 | Base 9.0, Temporal 8.1 |
| CVE-2022-31480 | Unauthenticated denial-of-service | <=1.291 | Base 7.5, Temporal 6.7 |
| CVE-2022-31481 | Unauthenticated remote code execution | <=1.291 | Base 10.0, Temporal 9.0 |
| CVE-2022-31486 | Authenticated command injection | <=1.291 | Base 9.1, Temporal 8.2 |
| CVE-2022-31482 | Unauthenticated denial-of-service | <=1.265 | Base 7.5, Temporal 6.7 |
| CVE-2022-31483 | Authenticated arbitrary file write | <=1.265 | Base 9.1, Temporal 8.2 |
| CVE-2022-31484 | Unauthenticated user modification | <=1.265 | Base 7.5, Temporal 6.7 |
| CVE-2022-31485 | Unauthenticated information spoofing | <=1.265 | Base 5.3, Temporal 4.8 |
Target Selection
The first critical component to any attack is an entry point. As we lock down our firewalls and sophisticated routers, it can be easy to overlook the network-connected physical access control systems. According to a study done by IBM in 2021, the average cost of a physical security compromise is $3.54 million, and it takes an average of 223 days to identify a breach. This is why the team at Trellix began to look at the systems that facilitate physical access control.
While we had previously investigated devices in the realm of ICS/IoT, access control was a relatively new attack vector to explore. During the process of enumerating possible high-impact targets, we came across LenelS2, owned by the widely recognized Carrier brand. The company immediately stood out to us given their global distribution of access control systems deployed across multiple industries including education, real estate, healthcare, transportation, and certified for use in federal and state government facilities. The line of access control boards with FIPS 201 certification, authorized for government use and added to the APL (approved products list), piqued our attention. (Figure 1)
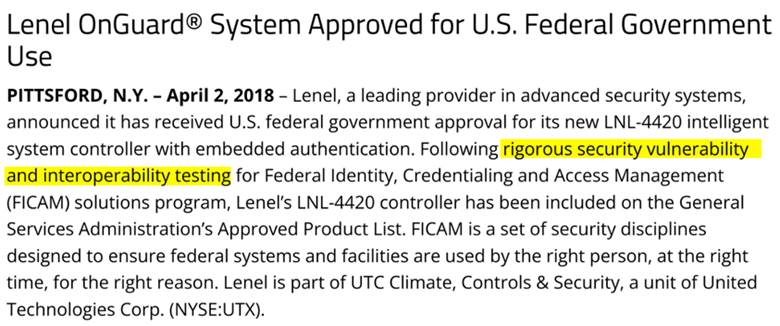
This is what a security researcher sees when reading the paragraph above:

We were curious; what did this certification mean? Was it trustworthy and what level of confidence were government and other consumers placing in these “rigorous security” tests? We simply couldn’t ignore the potential to unpack this further. During the eventual disclosure process, we learned that this material was intended to represent physical access security certification, and not cyber security validation. However, from our perspective, it didn’t change the overall approach and motivation towards testing the security features of the underlying controller.
What is it?
The LNL-4420 controller highlighted in this series was a flagship product for LenelS2 but has recently been marked “end-of-life” and replaced by the nearly identical X4420, which is one of nine controllers vulnerable to all issues reported in this publication. This panel can control 64 downstream devices; typically, these would be card access reader interface modules. It has 96 MB of available flash memory and is network-connected via Ethernet. It integrates with management software called OnGuard and can be extended for building automation using the ASHRAE-BACNET protocol. Overall, it is very straightforward and purpose-built for building access control.
Who makes it?
The LenelS2 LNL-4420 access control panel is manufactured by Mercury Security, which was acquired by HID Global in 2017. As HID Mercury has numerous industry OEM partnerships, we eventually found out that this is commonplace for vendors in the building automation and access controls industry. Due to the scope of our research, we limited all our testing on the LenelS2 branded boards. However, we discovered throughout the disclosure process that our vulnerabilities affected every OEM business using Mercury boards, representing more than 20 vendors. Ultimately, we ended up working closely with Carrier who handled the vulnerability disclosure process from the vendor side. We also want to give a shout out to Carrier for how they approached our disclosure and how great they were to work with. It was a wonderful experience interacting with their security team on the process of getting these vulnerabilities patched and publicly disclosed. It’s worth pointing out that the vulnerabilities discovered were not in any software under Carrier’s control, but as one of the OEM partners of the boards, they felt responsible for helping facilitate the disclosure process with the affected vendor, HID Mercury.
After finalizing target selection with the LNL-4420, we naturally tried to go about acquiring one in the cheapest way possible (i.e., trusty old eBay). For just a few hundred bucks, we got the exact board we were looking for within just a few days. (Figure 2) By acquiring the device on a commercial marketplace, we didn’t get access to any of the software - including the OnGuard suite, which is used to manage and update the controllers. But that didn’t stop us and like eager little beavers, we practically gnawed through the box and got to work in the lab.

Reconnaissance & Standard Operations
Recon
An important step in identifying attack vectors is to understand how the target is designed to be utilized and work in a normal environment. We first wanted to see what we could do with this device: what settings are exposed, which ports are open, and whether authentication was properly implemented. These essential steps are core to beginning any vulnerability research and can prioritize where attacks may have the most impact.
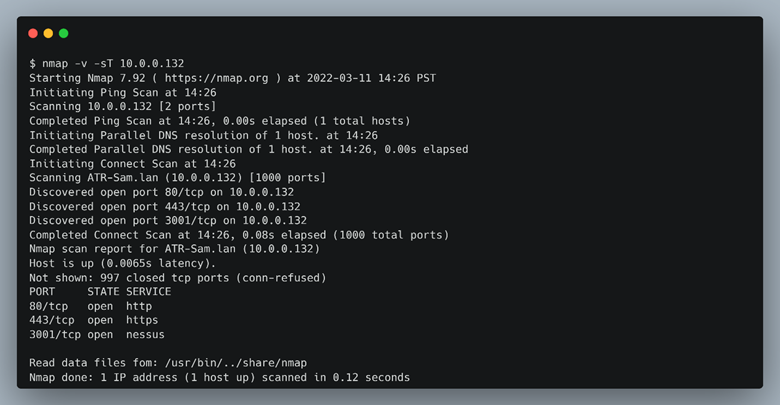
One of the first steps when performing recon on a new device is to see which ports are enabled and listening. A simple Nmap scan (Figure 3) can provide valuable intelligence about a target.
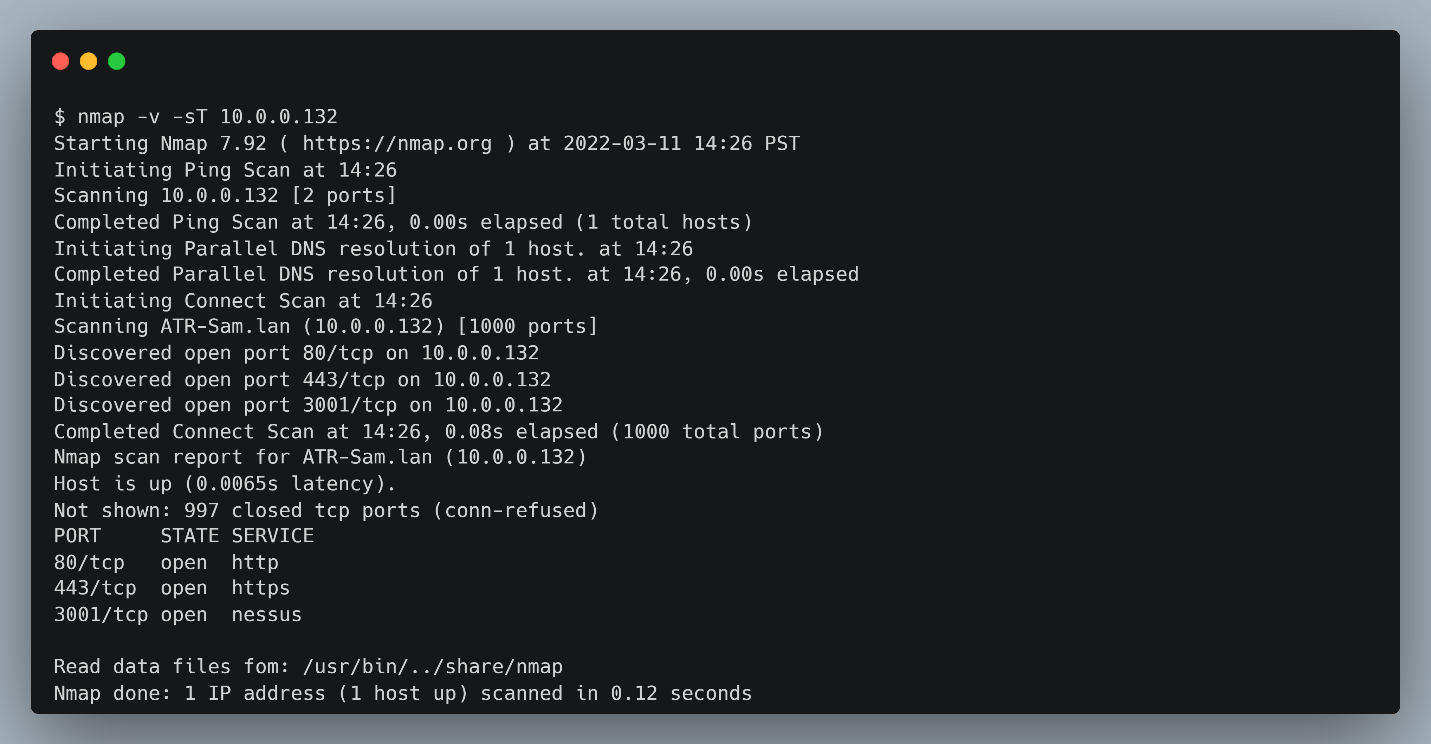
The LNL-4420 in the default configuration listens on 3 ports: 80 (http), 443 (https), and 3001 (Unknown). We couldn’t trivially communicate with the device over port 3001, browsing to this port resulted in no response, and connecting to the port using netcat was a dead end. Later, we discovered that this is how the OnGuard software communicates to the device. Navigating to the http port just redirected requests to https and a typical user login page. (Figure 4)
Standard Operations
Since we acquired this device off eBay, we didn’t have an instruction manual or username and password. Luckily, we were able to find an installation guide on the internet that described how to login to the device based on DIP switch settings as seen in Figure 5.
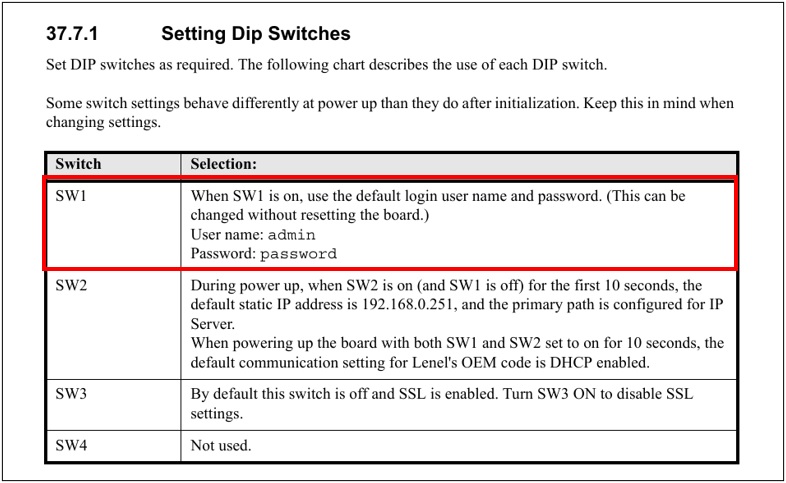
Simply setting the SW1 to “on” allows the default credentials “admin:password” to be accepted without resetting the device. This means if anyone had physical access to an LNL-4420 panel they could simply flip SW1 and have admin access to the web interface. Granted, the panel is typically inside of an enclosure, and often physically protected behind the same access controls it operates, but this still serves as a viable physical attack surface.
By setting the DIP switches appropriate and booting into the device, we were able to log in to the web server as administrator, where we noticed that there were a handful of options that could be set directly via the web interface. (Figure 6)
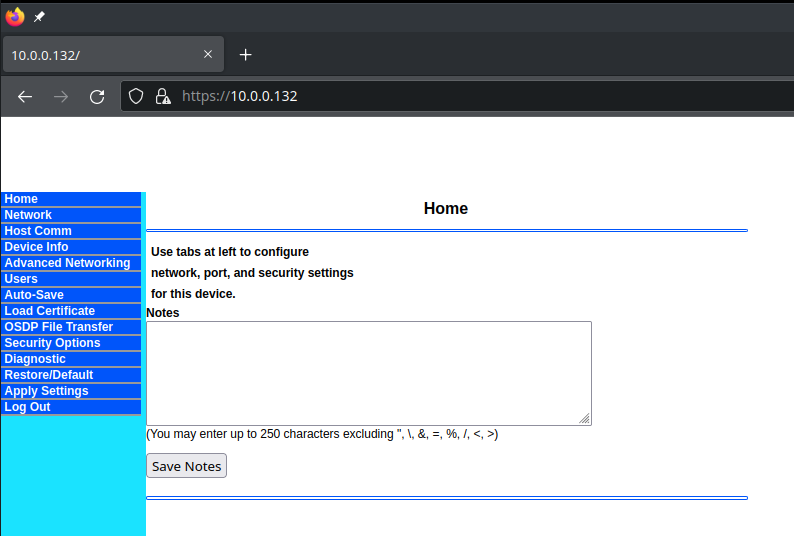
At this point, we began to enumerate each of the navigational tabs in the user interface and started to take notes on which of these pages allowed user input. User input can be low-hanging fruit for an attacker looking to trigger vulnerabilities such as buffer overflows, command injection, cross-site scripting, arbitrary file uploads and numerous other network or web-based vulnerabilities. If we were able to find a way to cause the device to misbehave from user input, we would likely be able to use it to our advantage while attempting to exploit the device.
We discovered that several navigational tabs took user input. These include Home, Network, Host Comm, Advanced Networking, Users, Load Certificate, OSDP File Transfer, and Diagnostic. As seen in Figure 6 beneath the notes section, there is specific mention of certain characters that are prohibited. These are common symbols for command injection, XSS or SQL injection, so we knew that the developer had put at least some basic thought into attempting to defend against common input attacks. We will revisit these character restrictions and our attempts to find vulnerabilities in the webserver in part 2.
Poking around each of the settings that allowed user input, we started to notice that this admin panel is not the whole picture. While we could set many of the device specific settings for the panel including hostname, IP settings, routes, and certificates, none of the settings we discovered had really anything to do with access control functionality. For instance, there were no settings describing badge or card reader setup, door relays, scheduling, automation and much of the other features we expected to see from an access control panel. It reinforced our initial stipulation that the OnGuard management software was likely to be essential to understanding security operations for physical access control. OnGuard allows for administrators to provision the controllers, such as the LNL-4420, with the specific settings of various card readers, badge credentials, and door opening policies. But perhaps most importantly for our research project was that the OnGuard software can upgrade the control panel’s firmware. The problem is that the only (legal and ethical) way to get the OnGuard software is to go through a licensed installer, who can provision the server software on a machine and install valid licenses. Not something we could do ourselves and was most definitely not included in our eBay purchase.
However, armed with working knowledge of the standard operations and the board to test them on, we decided it was time to get started on looking at the hardware with the goal of getting a root shell to facilitate deeper system enumeration and vulnerability discovery.
Hardware Hacking
While we had already unpacked the device, done some initial recon and inspected the web interface, we hadn’t put any time into the hardware to this point. As we started to dig in, we noticed right away that there were plenty of IO ports available, as well as USB-A, an SD card slot, a 20-pin connector😉, and a 4-pin connector, all potentially ripe for hardware hacking.
This is a great time in the research process to pause and lay out a full plan of attack, focusing on an iterative methodology to achieving your target goals, and then clearly documenting them. We did none of this whatsoever and immediately started soldering. But you should do it. But we didn’t.
All jokes aside, post-mortem we want to share a high-level approach for anyone who is newer to hardware and software analysis. In its most simple form, a solid approach is to move slowly, identifying as much about the target hardware as possible. Many times, this can be done before you even have the device in hand, using FCC documentation, product specs, prior research and any additional OSINT methods. Don’t overlook the possibility that you can simply download firmware from the vendor’s website; no need to recreate the wheel if you don’t have to! If your focus is on pulling contents off the board such as memory and/or firmware, you’ll need a hardware interface to the device; something like JTAG or UART. Most modern devices won’t let you simply connect to these ports and download firmware; if they do, consider yourself having won the hacking lottery. Even if they do, you’ll likely be dealing with either encrypted contents, password-protected logins, or boot-restrictions. If you can bypass this, you’ll be in a good position to further your research by emulating the device, using any number of tools to recreate the target for vulnerability analysis, without any risk of damage to the device.
One of us (not Sam), was pretty much a n00b at hardware hacking, as opposed to my cohort on this project and others on the team who just look at hardware and it gives up the ghost. So, we thought it might be fun to recreate the steps in full (and perhaps overly detailed) from what we learned here, as many of the steps we went through will apply to hardware targets the reader might be interested in. We also decided to provide a quick reference for the tools referenced throughout the following sections.
Hardware Hacking Shopping List
- Segger J-Link
- Bus Pirate
- Multi-meter
- Power-supply
- Saleae logic analyzer
- Jtagulator
- Test clips and wire harnesses
- USB to Serial FTDI Basic Adapter
Hardware debugging with UART
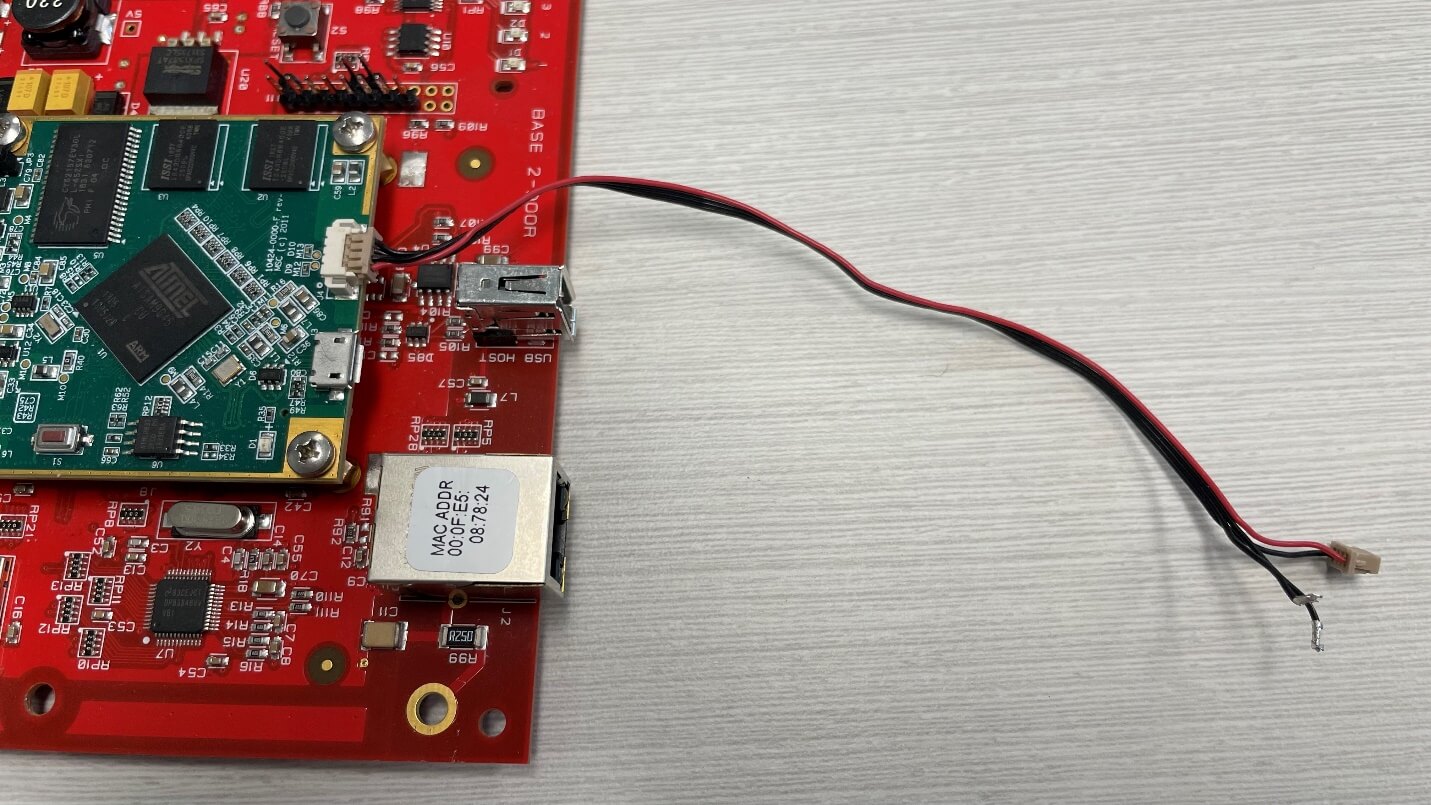
The first step was to identify whether we could use a serial port, such as UART, to get access to the boot process for the controller. Remember the 4-pin port we talked about earlier? It’s shown here in Figure 7. So why is this a good candidate for UART? Well, UART is almost always integrated directly into the microcontroller so that there is a serial communication that only needs two wires at minimum – transmit (TX) and receive (RX). There are other candidates on this board for serial, but given the 4 pins, it's likely we have TX, RX, Ground (GRD) and probably a power pin (VCC). The only way to definitively find out is just to attach it to a logic analyzer or similar and see what you get.
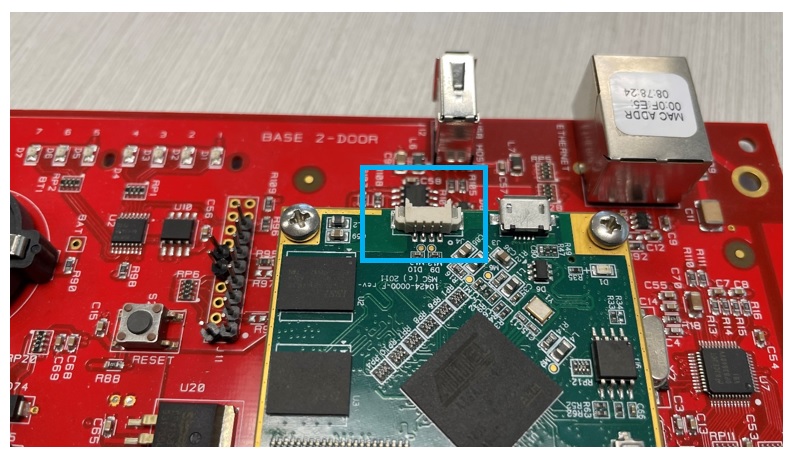
So, with our UART candidate determined, we grabbed a simple 4 wire connector we found laying around – and plugged it into the pins. We did split out the 4 wires for ease of tracking as shown in Figure 8.
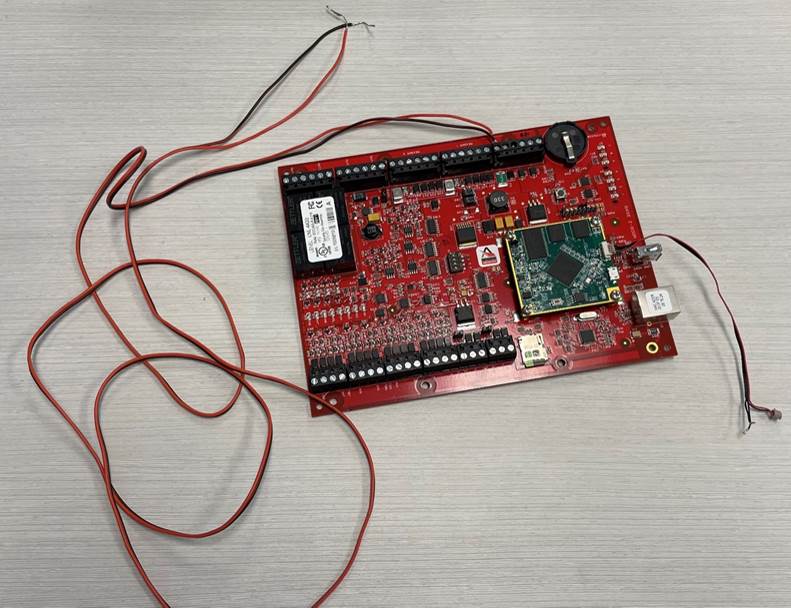
Power seems like a good idea if we want the device to boot, right? Ok – so we also grabbed another pair of wires to connect to a power source – in our case, we use a DC Power Supply to provide exact 12V voltage to the board, connected to the VIN (voltage in) and GND (ground). The voltage can be seen printed on the board in Figure 9. See Figure 10 for the power wire connection and Figure 11 for the full picture of the power supply connected to the LNL-4420.

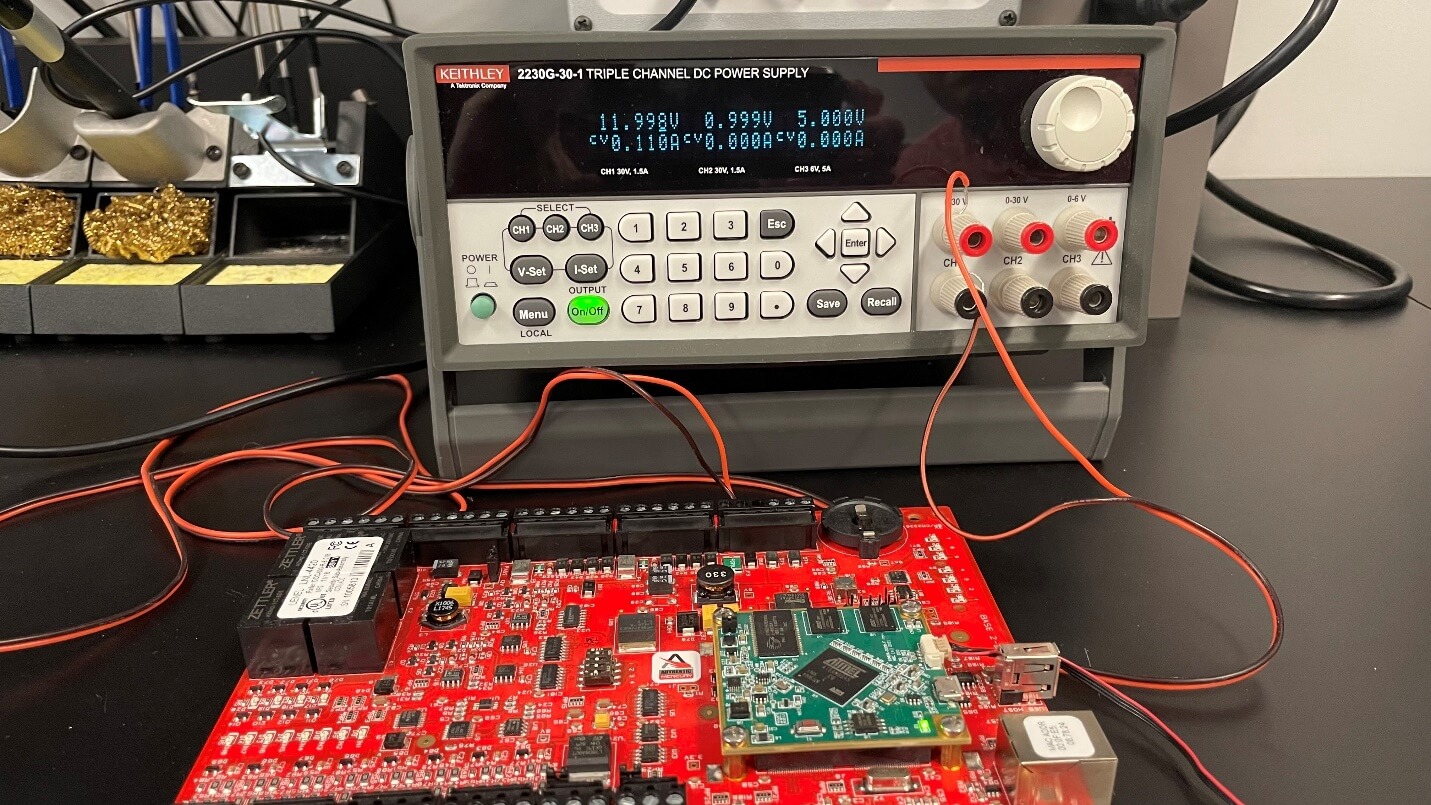
We provided a fixed 12 volts to the board as we knew that’s what it expected to receive. By attaching a multimeter to each of the 4 pins on our suspected UART, we could easily identify the voltage was 3.3V at the port, and that one of the pins was a ground pin.
If you don’t have a multimeter, you should get one! Or, in a pinch you can connect the pins to a logic analyzer, such as this Saleae we used, and try to figure out the function of each pin. Test clips and wire harnesses will help simplify and secure your connections.
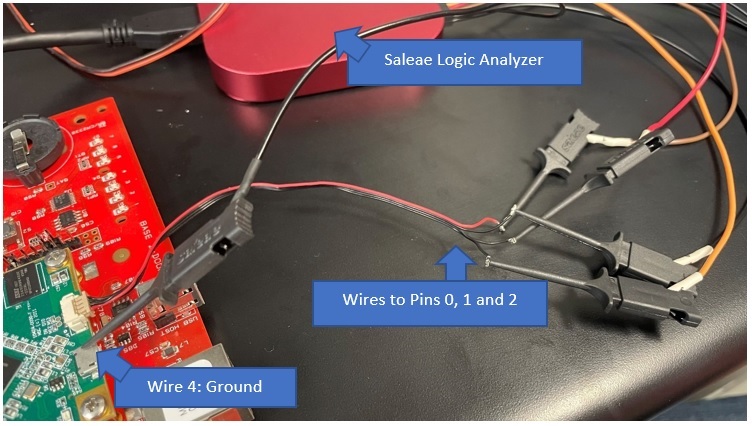
Let’s explore this alternative – Figure 12 shows 4 pins connected to the (probably) UART. We pick 3 arbitrary wires (call them 0, 1 and 2), and by checking what the output is in the logic analyer software, we can determine which is TX, RX, Ground and Power. We chose an arbitrary wire and connected to a grounded metal chassis on the board, then connected it to one of the labeled ground pins on the Saleae.
Now for the software piece – we pulled down the freely available Saleae software, and upon running, were greeted with an initial configuration setting - Figure 13.
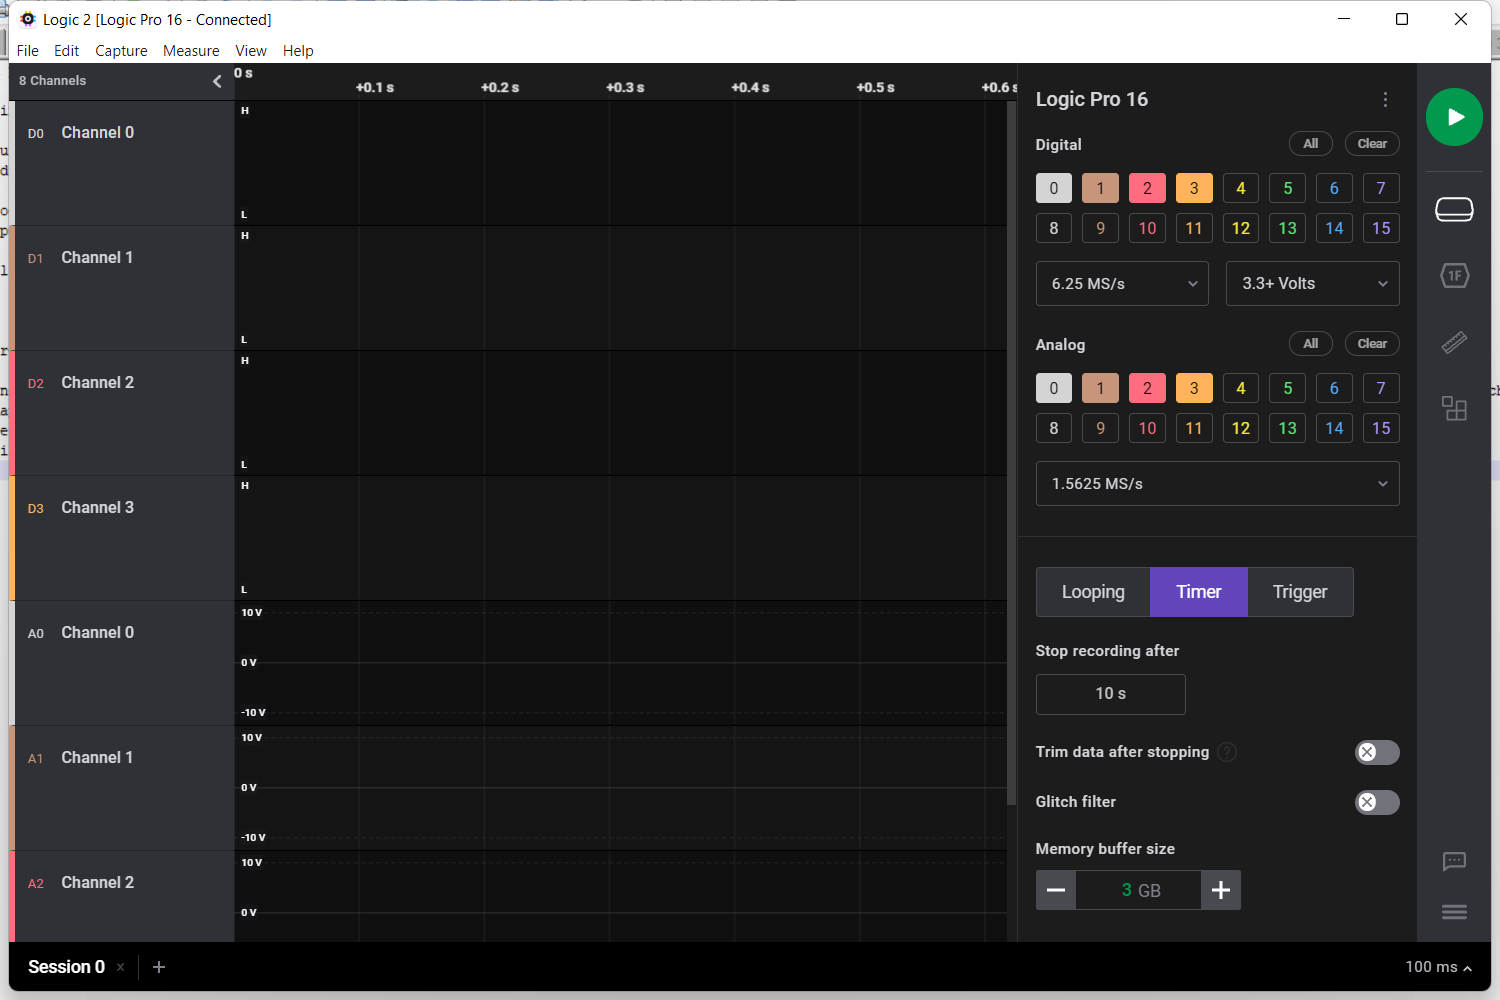
In this case, we chose Digital only to keep the screen more readable, and selected 4 pins (0,1,2,3). Figure 14 shows the options we set up. Typically, we select the channel (pin 0 is channel 0), bit rate or baud rate (most common is 115200), and the rest should generally stay default.
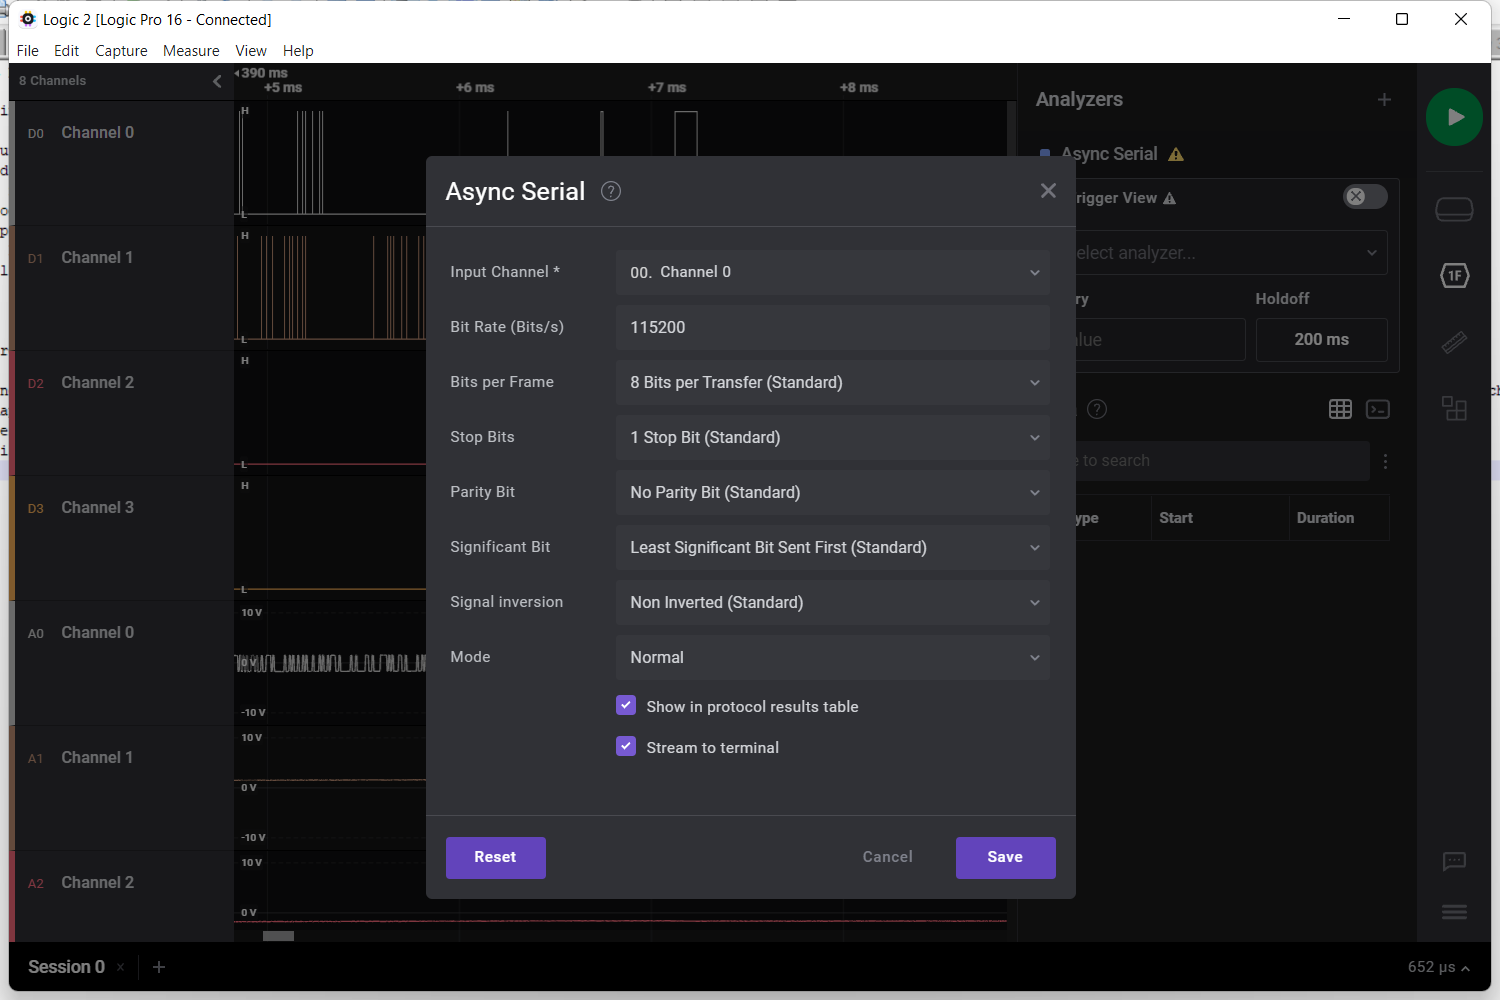
We ran a 10 second sample, which was plenty of time to capture any data sent as the device powers on. The order of operations was selecting “Play” or “Capture” from the Saleae software, and then immediately providing the board with power from the power supply. After testing all 4 pins, we came to the following conclusion:
- Pin 0 showed data
- Pin 1 showed a spike that never dropped, indicating constant current, and we realized this was 3.3V out – or transmit (TX)
- Pin 2 showed a transient, and then nothing – meaning it was likely in “receive” mode (RX), but not actually connected
- And our fourth pin, pin 3, was connected to ground via a clip to some chassis metal on the board
These results can be seen in Figure 15.
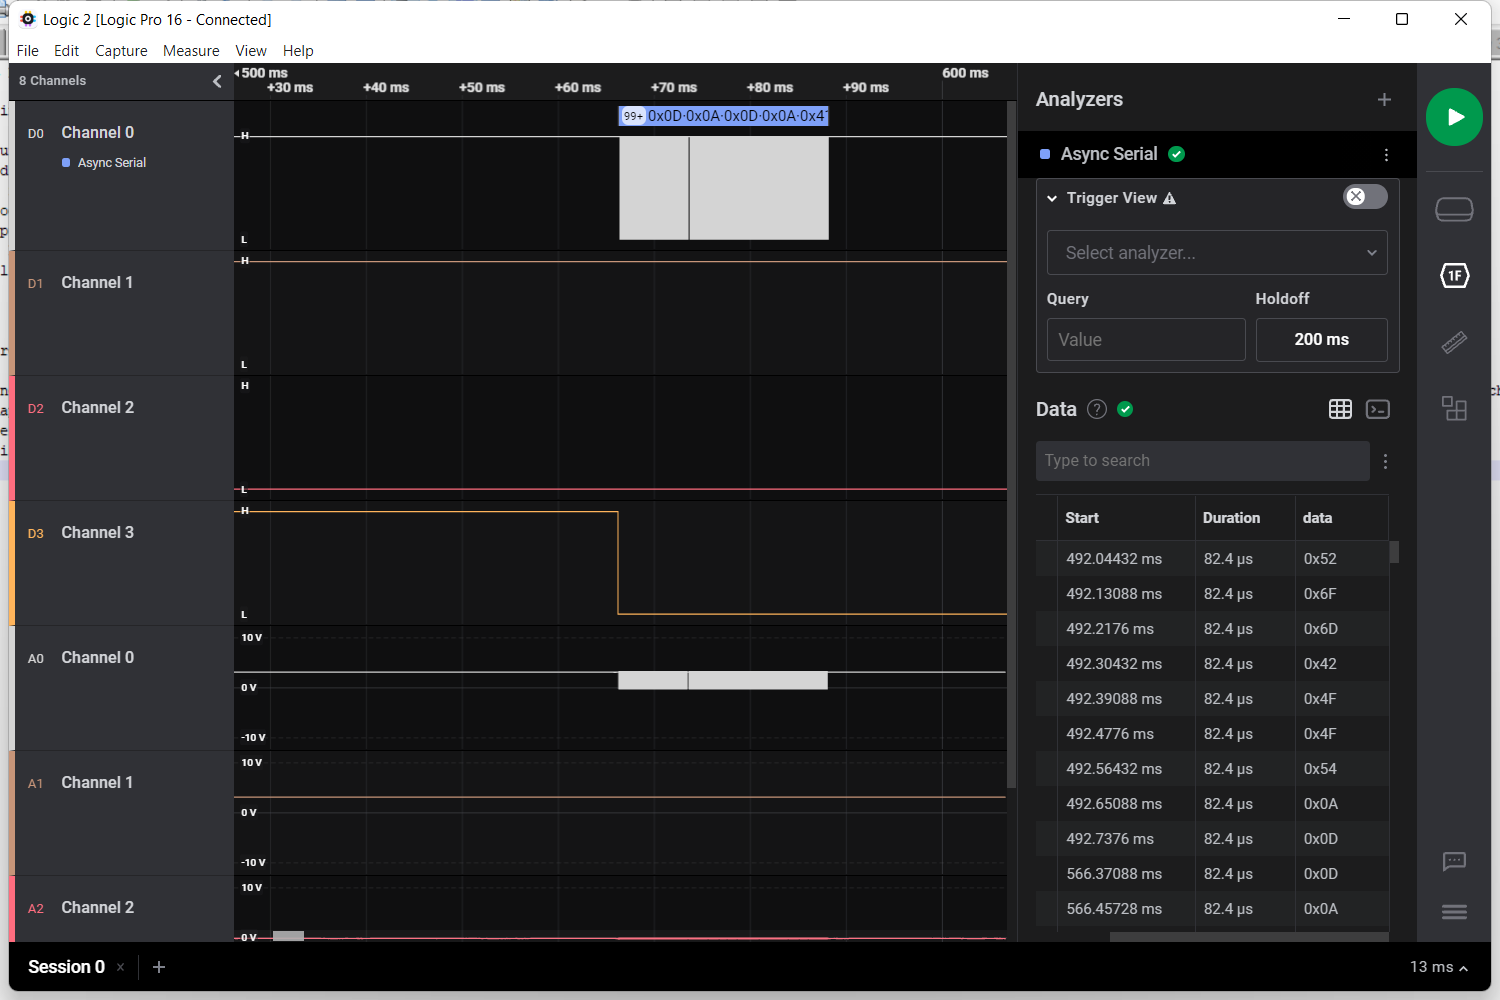
Note – you may need to zoom in from the macro view in the software, when looking for data – what might appear as a blip at first, on closer inspection, will show data as seen in Figure 15, Channel 0. There was ascii data in the Data column that read:

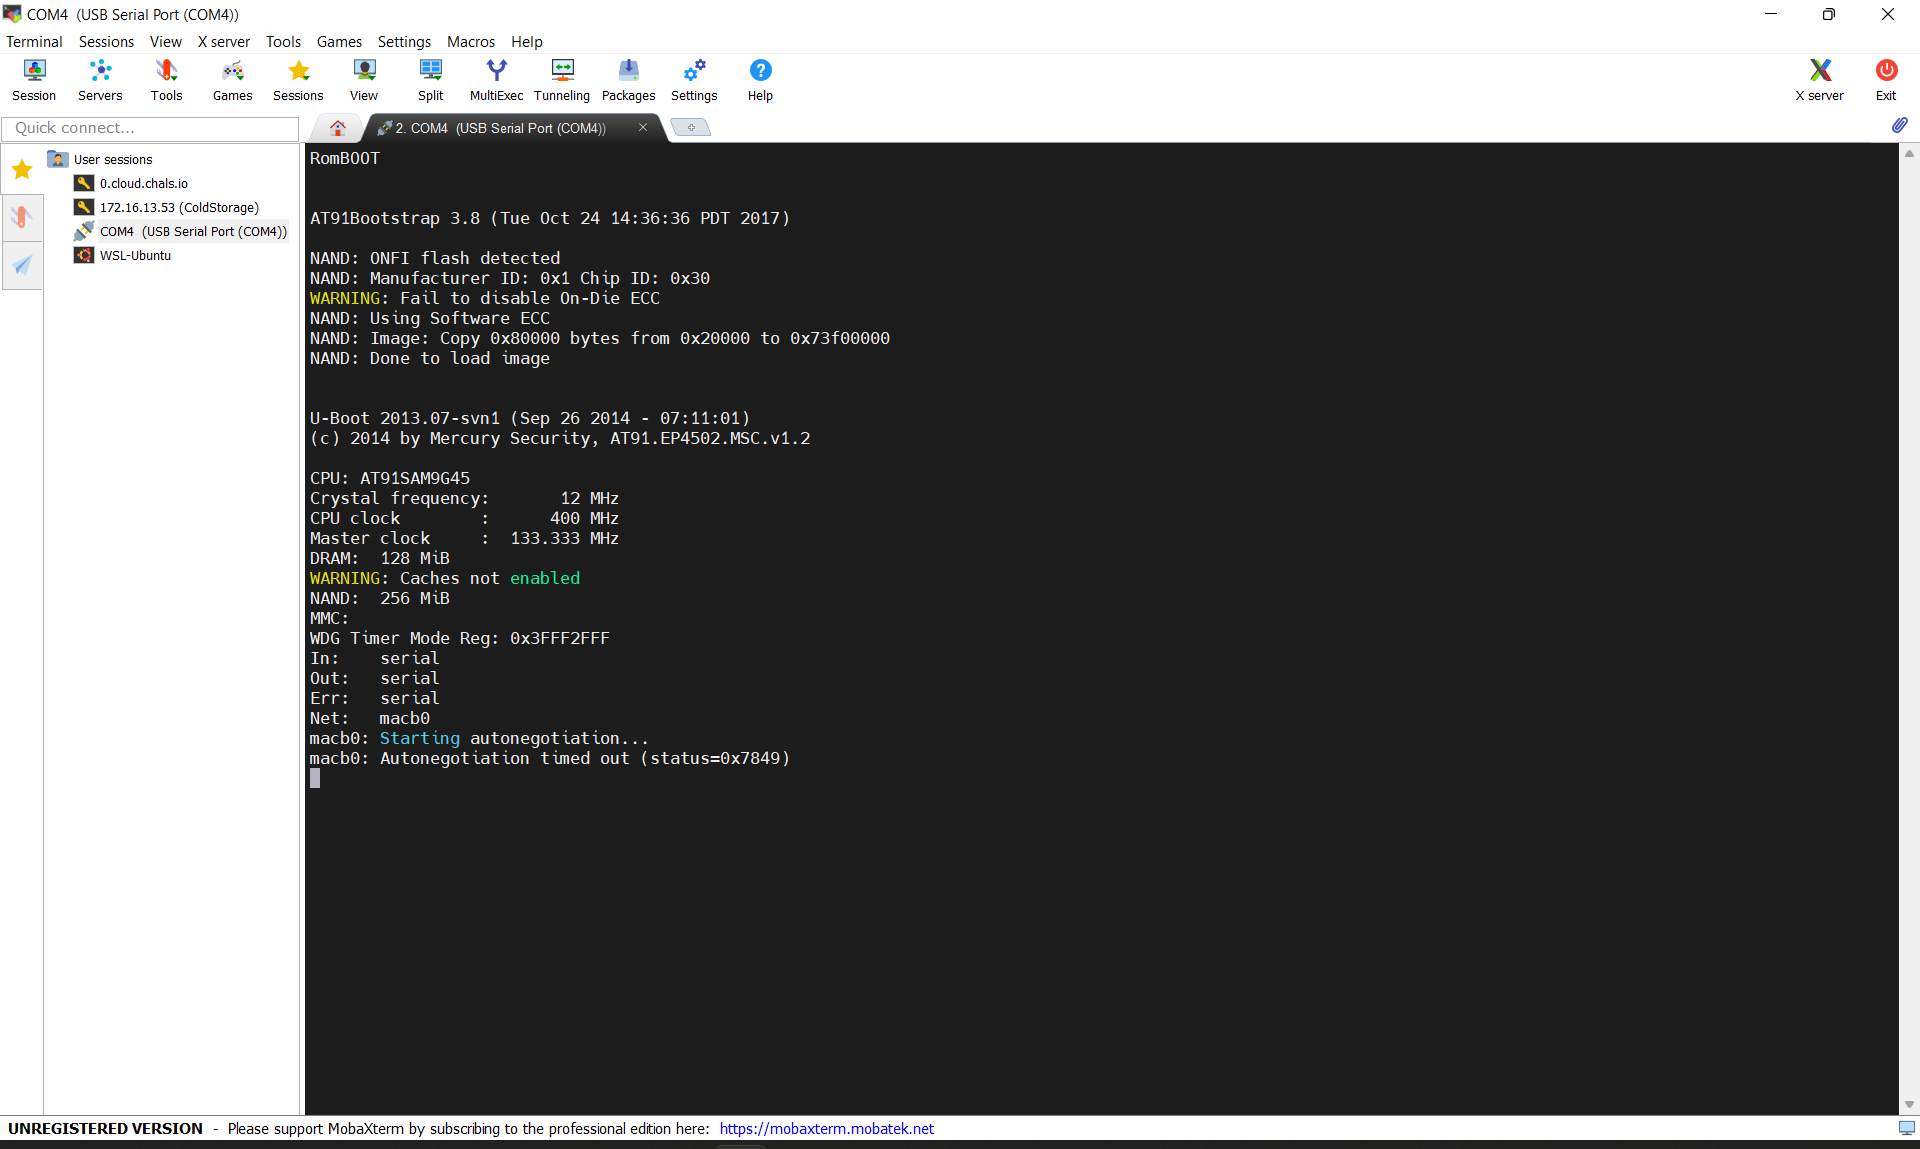
This translates from hex to ASCII as “RomBOOT” followed by newlines and carriage returns. All this work helped us confirm that we do indeed have a serial connection over UART, and when we booted the board, we captured part of the initial RomBOOT sequence!
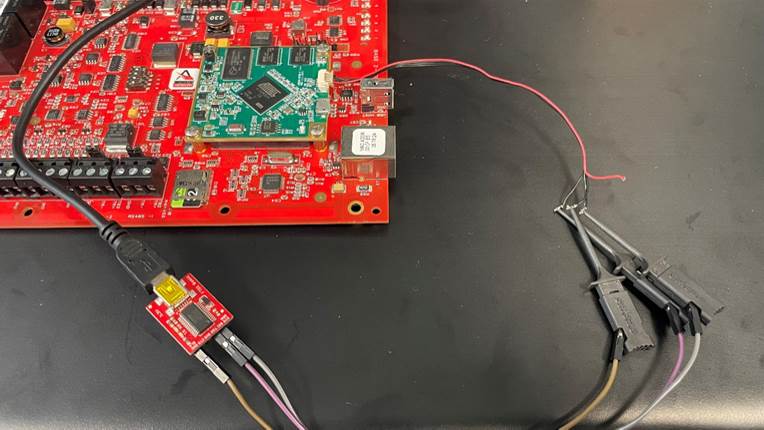
The next logical step would be to try to boot into the device with our UART connection. So, we removed the logic analyzer and replaced it with a USB to Serial FTDI Basic Adapter. This let us connect directly from UART to USB on a laptop or PC so we could observe the boot process. The connection is shown in Figure 17. The pinout was to connect receive (RX) to transmit (TX), TX to RX and ground (GND) to ground. We skipped a voltage pin because we were powering the board with the power supply already.
We use Moba XTerm as the tool of choice for establishing connections over pretty much any protocol – in this case, we set up a new serial connection, with the baud rate at 115200, replicating our earlier logic analyzer session. Figure 18 displays the basic settings.
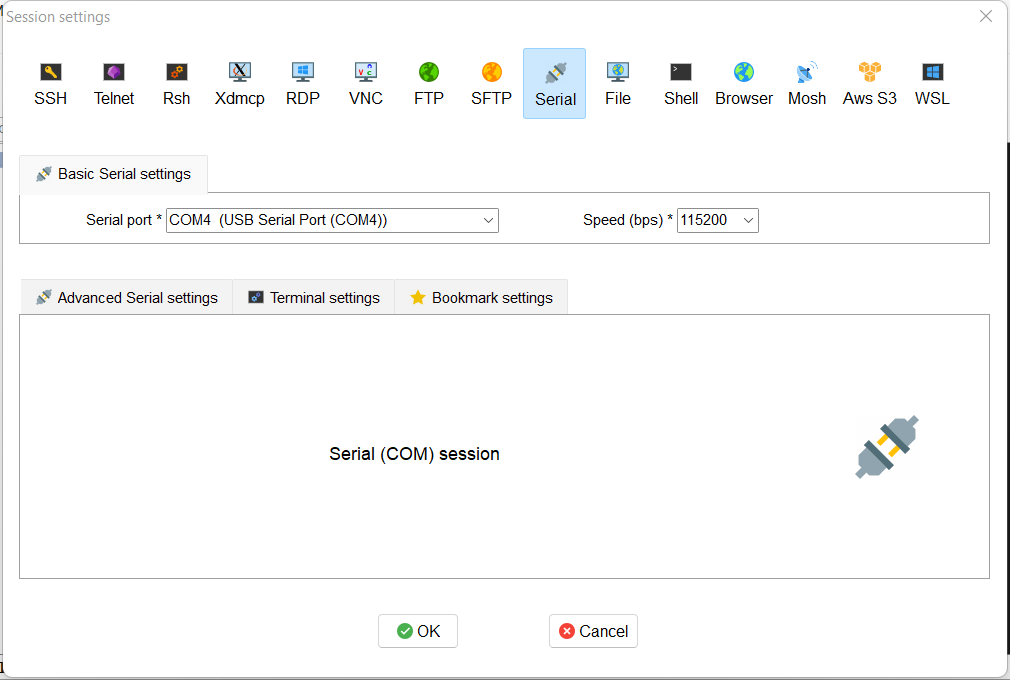
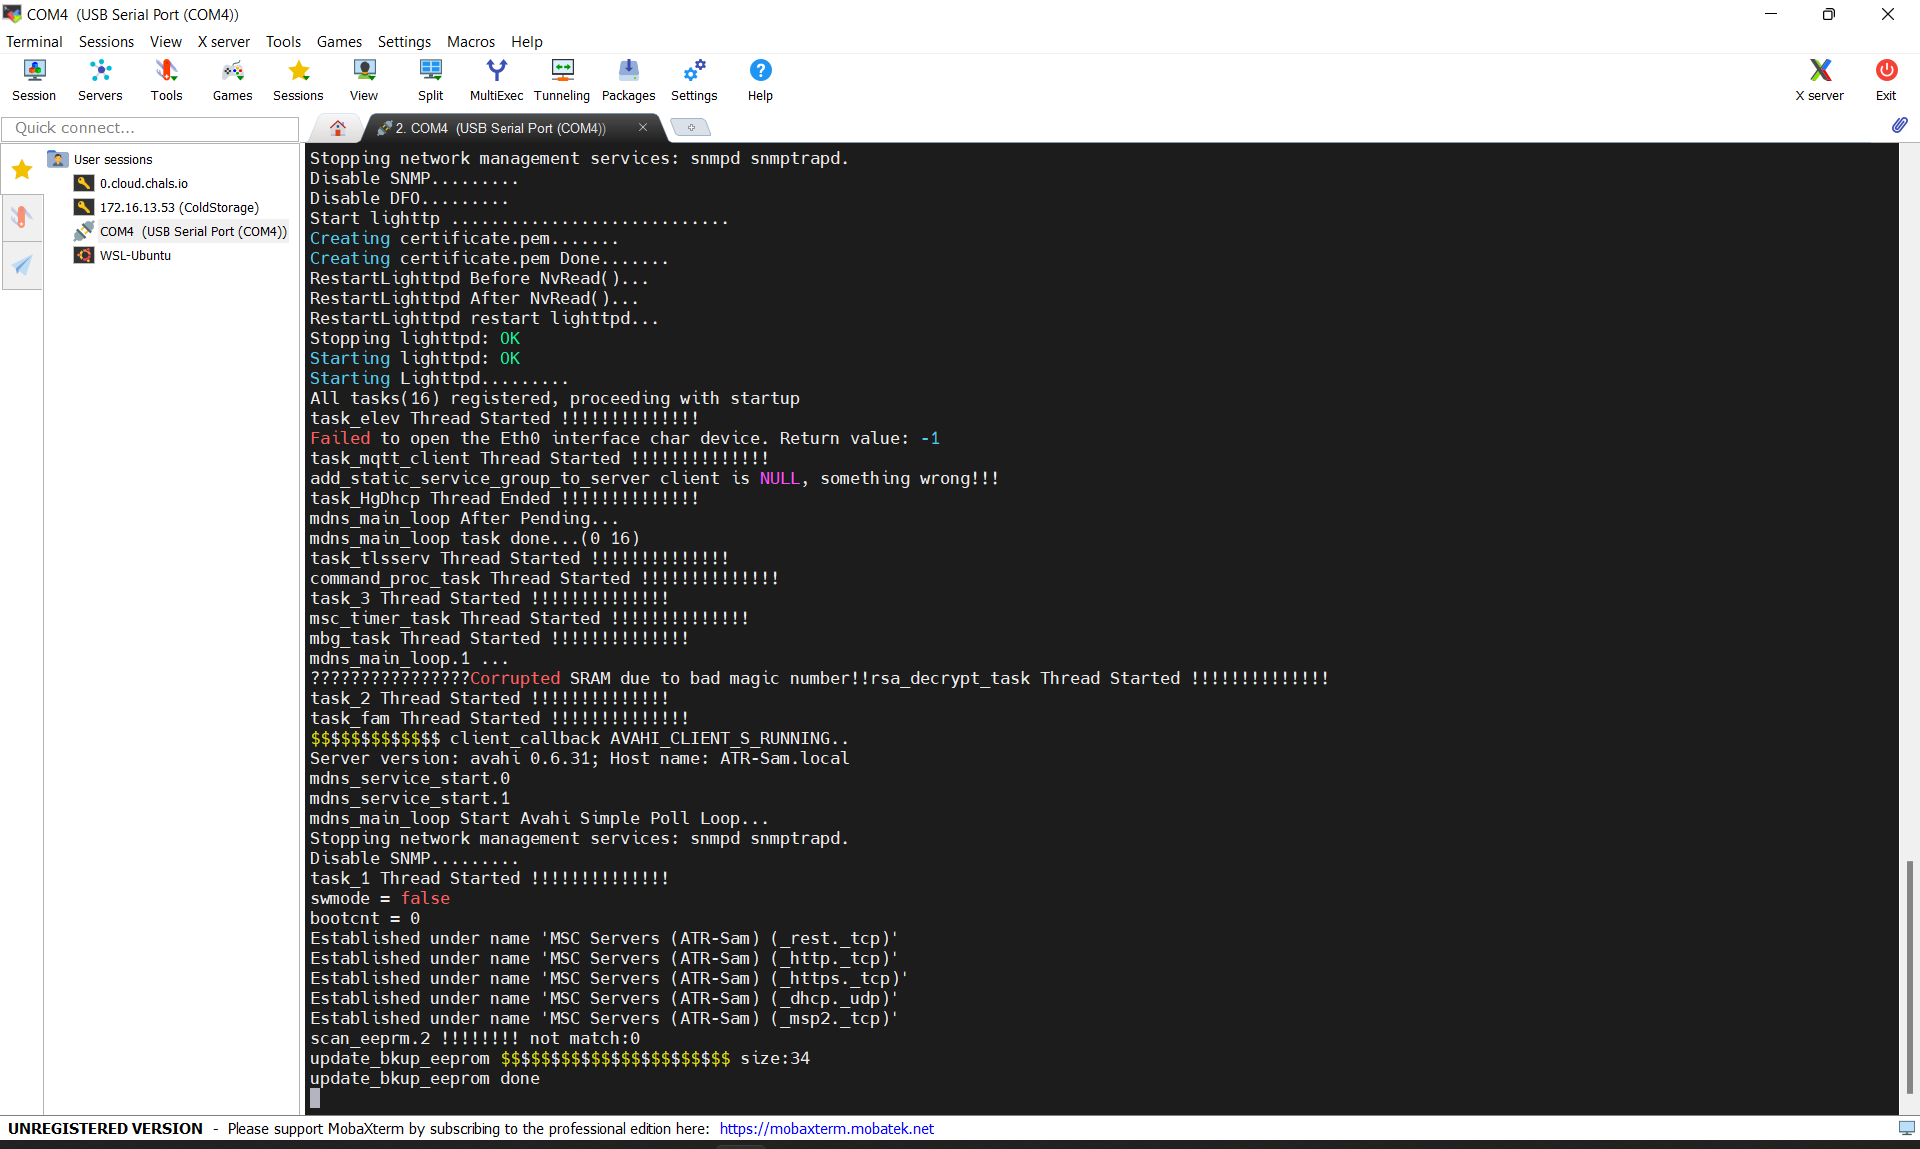
On powering the board, we did see output from the session, as shown in Figure 19. Yet, it quickly became apparent that the boot process would pause after a short time, (Figure 20), and we attributed this to the fact that UART was being disabled. This is done by developers to prevent a simple interface to the device using the techniques we’ve covered to this point – never fear, where there’s a will, there’s a way.
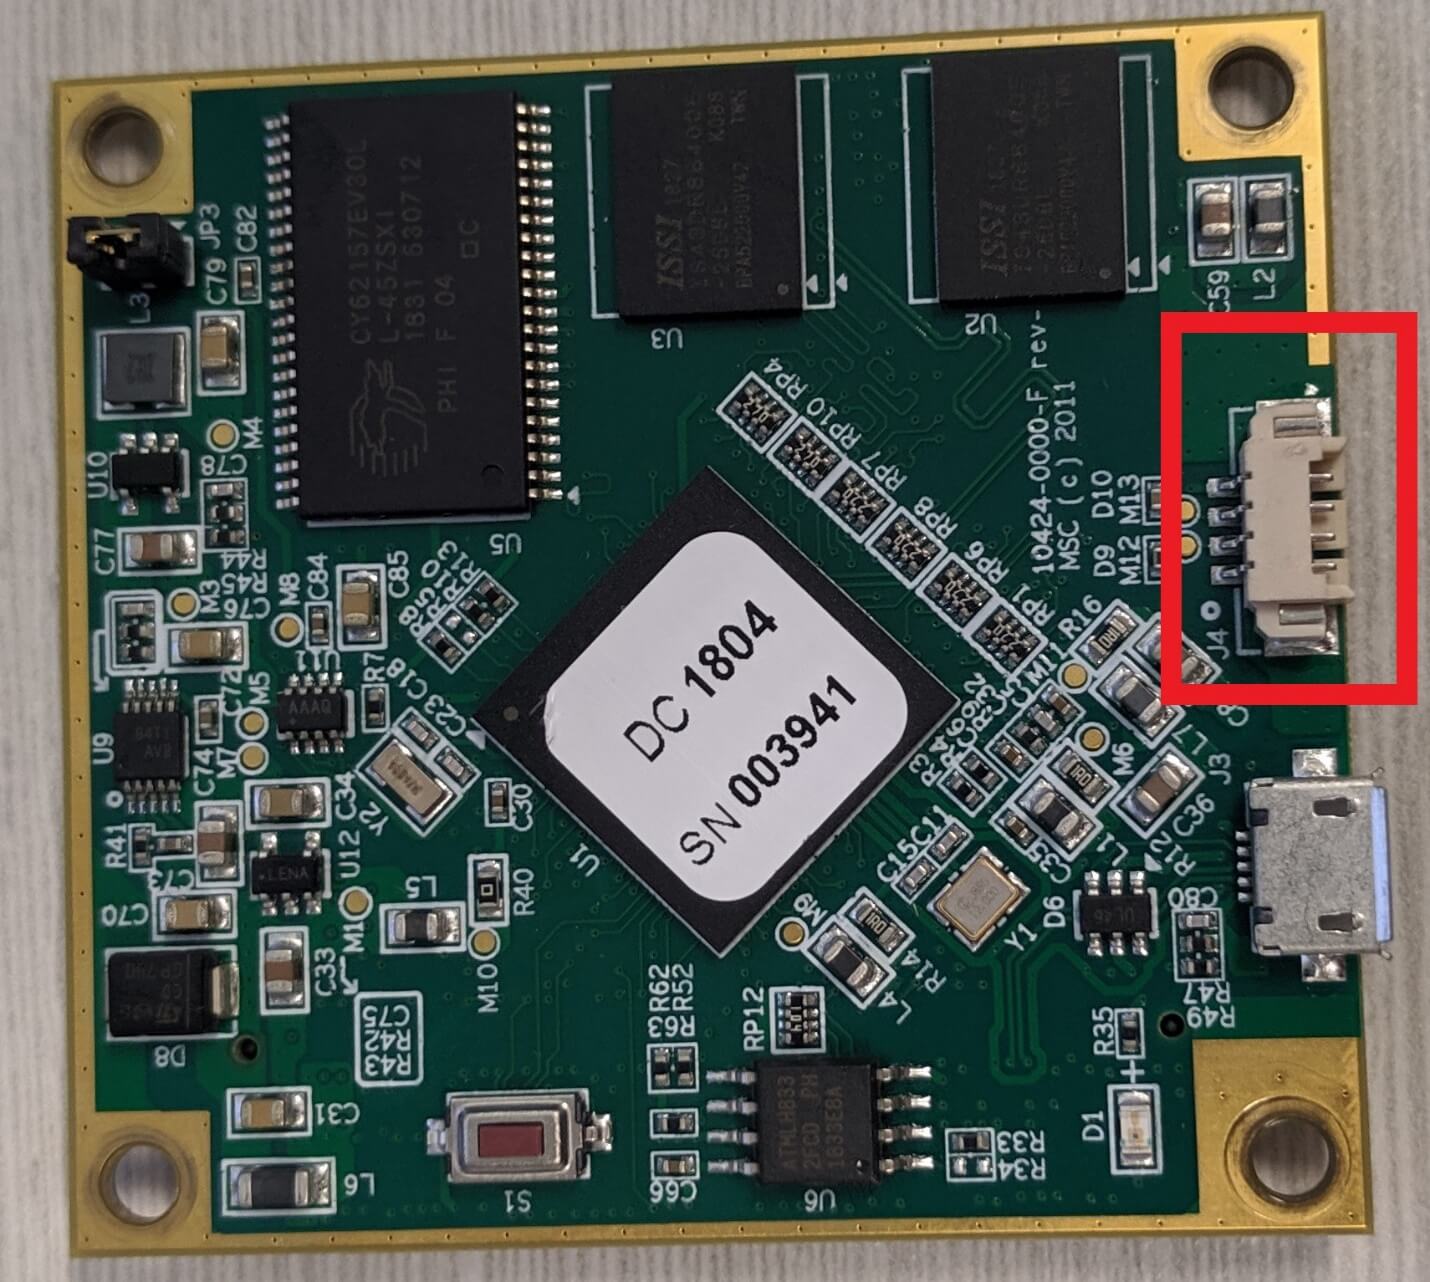
Not only did the UART console get disabled, but it was also read-only. Even if we could get the console enabled again, having a read-only UART has limited benefit, so we sought out a way to make the console read-write. To do this, we had to access the bootloader to modify the “init” variable with “/bin/sh”. Changing the “init” variable would bypass all the startup scripts that were most likely used to disable the UART interface. You can read more about this in this article on UART init. However, we had a problem; the bootloader (in this case “UBoot”) was configured to not allow the user to pause the boot process and access the Uboot shell. (Figure 22)
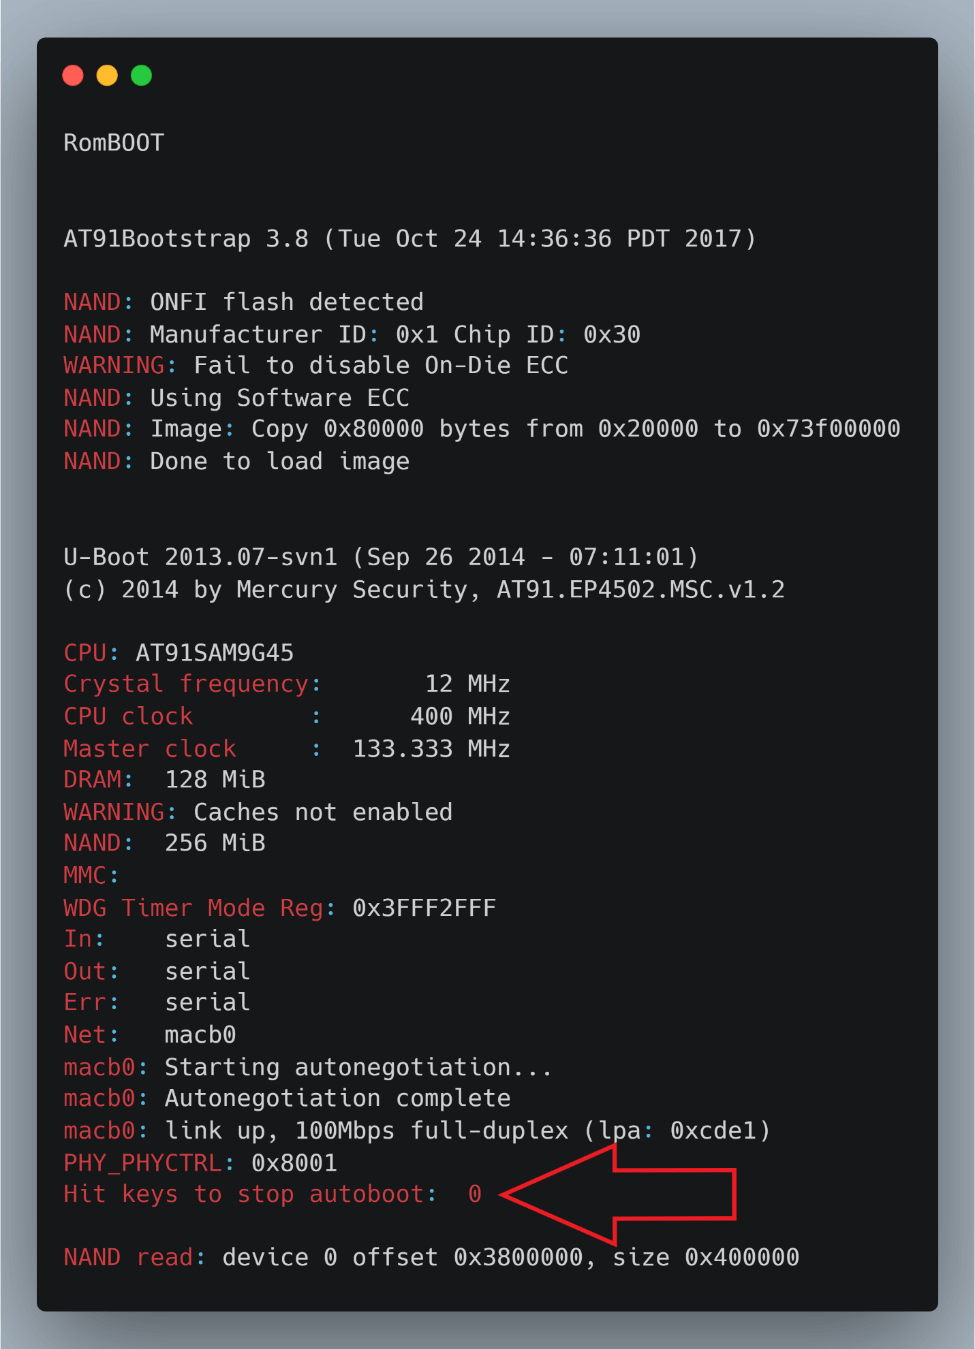
This is because the UBoot “bootdelay” environment variable is set to 0. Looking further into the UBoot documentation, we discovered that a value of 0 meant autoboot was enabled and interactive commands were completely restricted (Figure 23).

If you read past the red lines above, you may have noticed this variable, if set to -1, disables autoboot. Binary patching this value became our next strategy; the only question was how? Without the ability to pause or interact with UBoot, we were somewhat stuck.
Hardware debugging with JTAG
We weren’t going to get into the OS that easily. However, you may recall our earlier mention of the 20-pin connector. To an experienced hardware researcher (such as Sam), this might look very similar to a 20-pin ARM JTAG connection. As it happens, it was indeed a JTAG connection. It took a little bit of searching, but we managed to turn up the following pinout for 20 pin ARM JTAG.
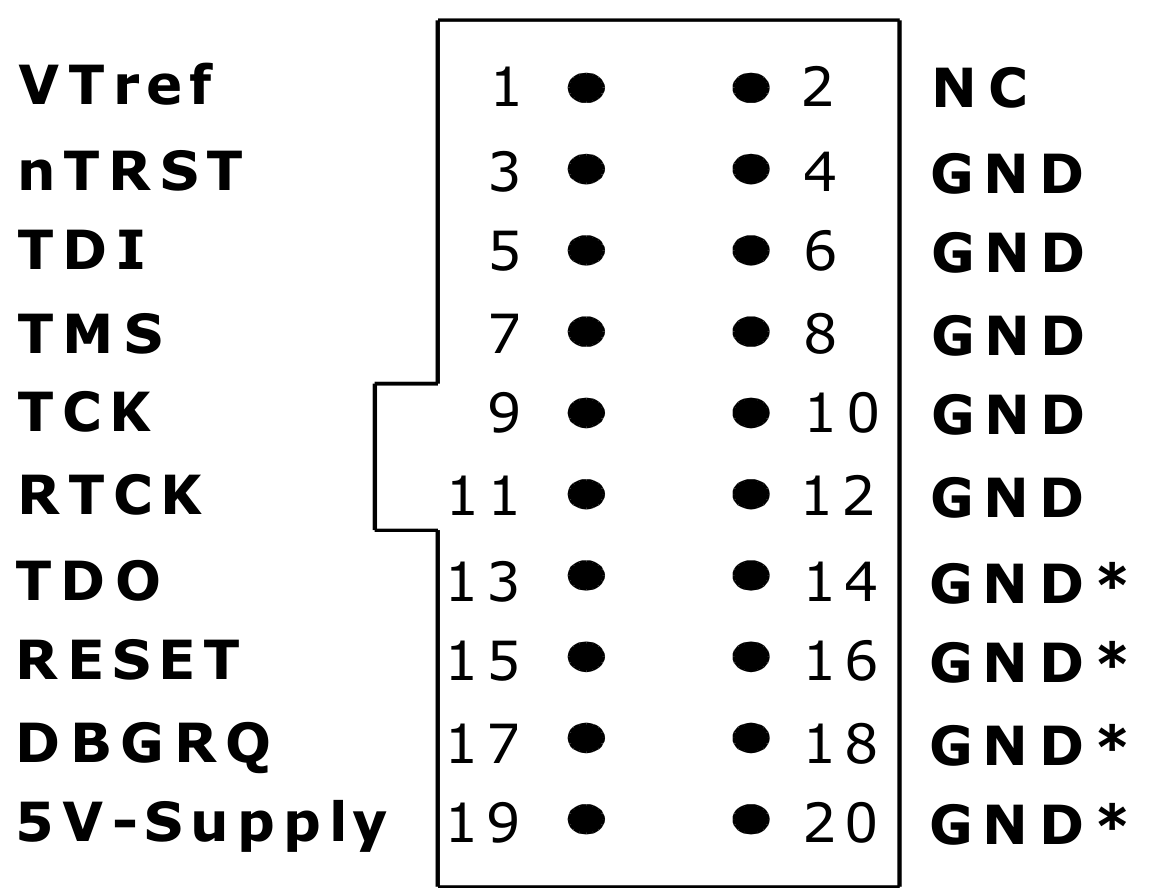
Time to play with some JTAG! We can use an anatomy analogy (say that 10 times quickly) to better understand UART vs. JTAG. If the CPU is the brain, then JTAG is mind control. While the onboard UART connection allows the user to interact with the console of the device, JTAG allows the user to interact with the internal working of the device, including reading and writing of memory as well as full control of execution. Segger makes a great JTAG debugger called the j-link. J-Link allows you to interact with the CPU, effectively providing the ability to issue break points, access memory and registers, and perform basic scripting. We used the Pro version found here.
A multimeter was used to help identify the 5V pin and the bottom row of ground pins as shown in Figure 24, so we knew the orientation of the remaining pins. We were able to visually line up the pins, imagining the j-link connecting from the bottom of the board. We attached one ground wire to one of the GND pins on the right side, and then connected the VTref (brown wire), nTRST (red), TDI (orange), TMS (yellow), TCK (green), RTCK (blue), TDO (purple) and RESET (beige) wires to the j-link as defined on the Segger website. Note that the “notch” in the pinout image is where the j-link device shows the word “Target”, so we knew which orientation to use there as well. Figure 26 shows the final rainbow wire pinout.
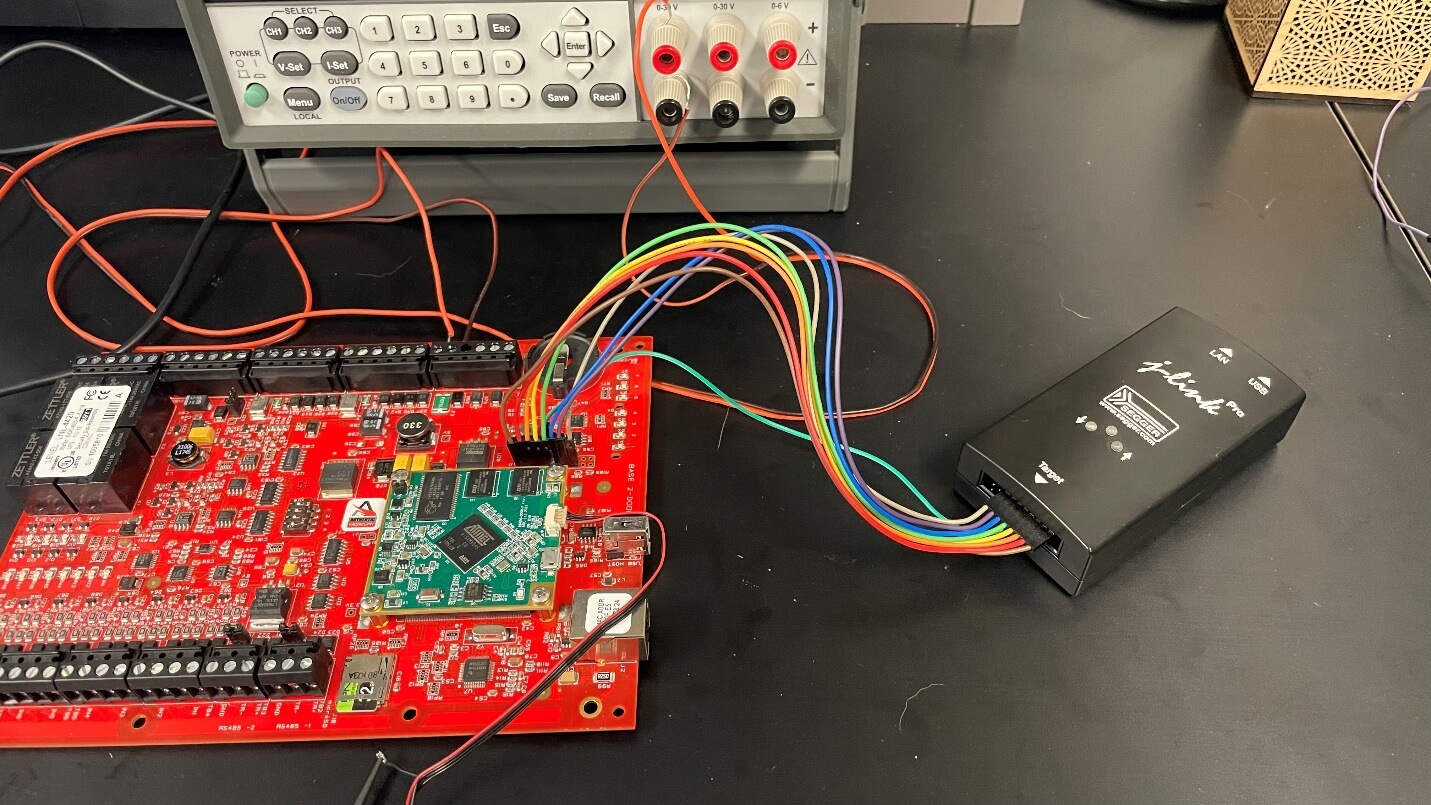
You can download the jlink software from Segger. We used Windows’ Powershell to run the necessary commands as soon as the “Autoboot” was on screen in our UART session. Using the shortcut in Figure 26 we were able to halt the boot process programmatically.

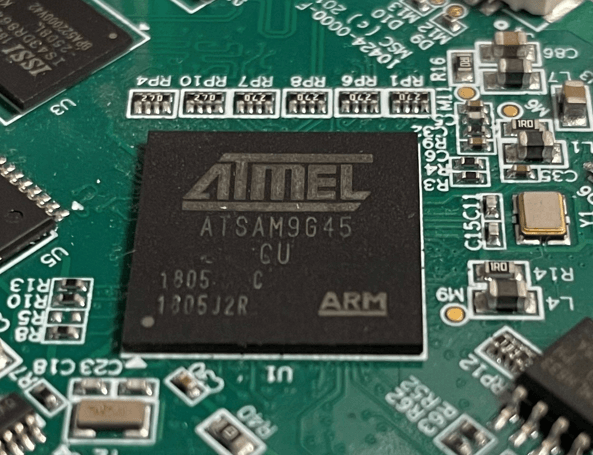
The “break.jlink” is actually a very l33t script that, we have decided to share publicly today. The device CPU “at91sam9g45” referenced in Figure 26 is taken from the ATMEL chip as shown in Figure 27 below.
This script allowed us to pause prior to UBoot using the j-link – the screenshot from Figure 28 shows the booting process of the device in a halted state.

Despite being able to pause the boot process, recall we still have the challenge of the “bootdelay” parameter making it impossible to interact with the terminal.
Modifying UBoot Bootdelay
We know from Figure 22 above that U-Boot code is copied from memory at 0x20000 to location 0x73f00000, which is in the executable memory space. Immediately after this copy, we see U-Boot executed. Logically, this meant we needed to place a strategic breakpoint via JTAG at the location of the string “Hit Keys to Stop Autoboot” as seen in Figure 22.
However, given the size of this image, we were unsure of which address to break on. The next step was to dump the UBoot code from memory, using the JLink “SaveBin” command (Figure 29).
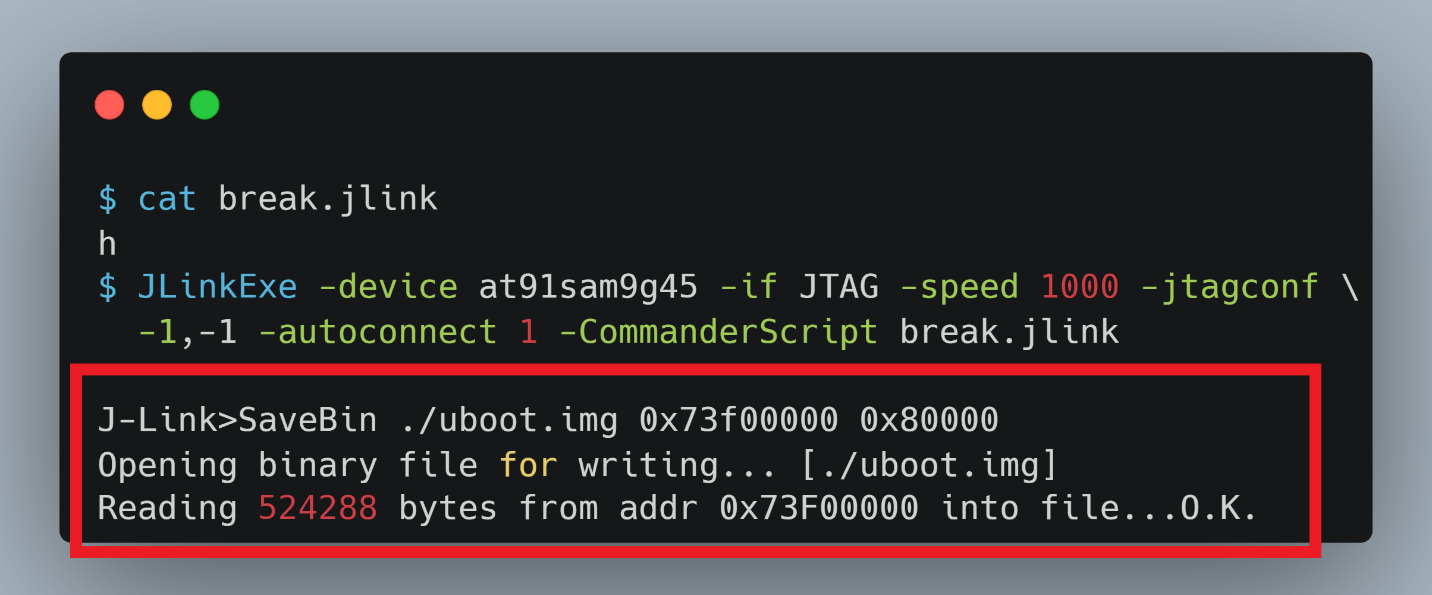
At last, we had a functional “binary”, which was just a raw memory dump but still contained the actual UBoot executable – the next step was to begin binary analysis.
Disassembly and Debugging
We loaded the binary into our de facto disassembly tool, IDA Pro. With many known binaries such as a PE or ELF, IDA will do much of the code analysis and definition during loading. In our case, we had a raw memory dump and needed to do some simple cleanup. Like all l33t reversers, we ran the strings command first (Figure 30), which allowed us to locate the UBoot print statement.

Learning hotkeys in IDA or other disassembly tools can be beneficial to rapid reversing and analysis. The default hotkey to run strings is Shift+F12. After finding the string address in read-only memory (Figure 31), we did a binary search to find the true address of the string in memory (Figure 32).

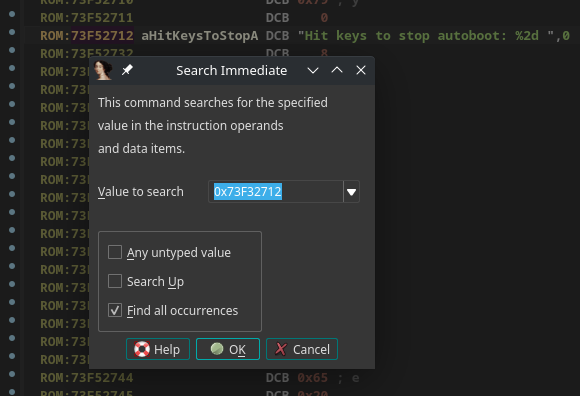
The reason we needed to perform a binary search for the address was because not all the code functions had been defined properly by IDA at this point. The result is shown in Figure 34, and led us to a sequence of bytes in undefined code (Figure 34). Because we don’t natively speak ARM opcodes, we used the default hotkey “c” to mark content as code, and “p” to mark code as a procedure or function which made both the code and graph views much more legible (Figure 35). For any strings we encountered, we used the hotkey “o” to tell IDA this was an offset to a string.

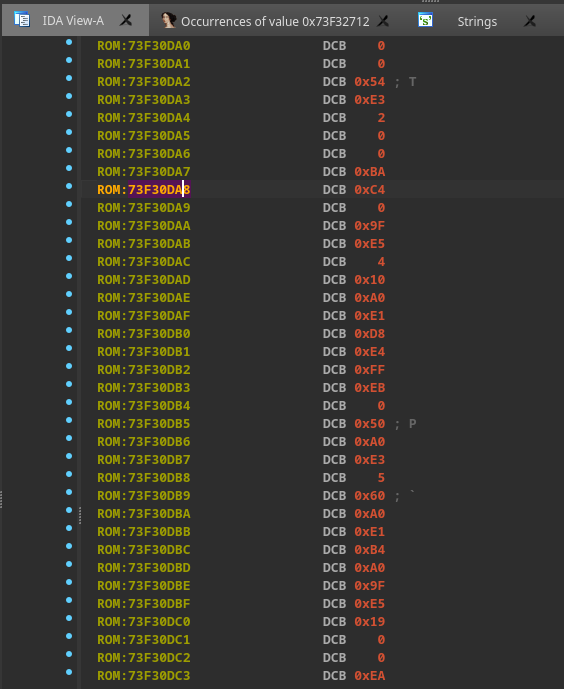
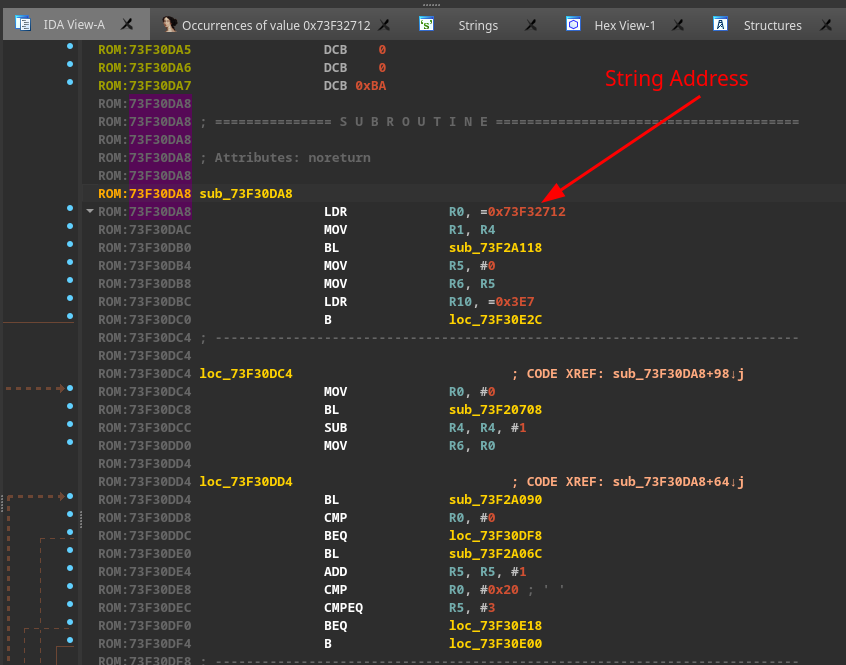
Now the code was much more legible, and we could move. As we saw, the device loaded the U-boot code into the address space at 0x73000000, but it got relocated before execution was transferred to it. This was evident since none of our breakpoints were ever getting hit while using the address range 0x73000000. To find the actual address where we wanted to break, we had to halt the CPU "inside" the U-boot code. Remember the J-Link breakpoint command from Figure 29?
It will automatically connect to the J-Link and will run the CommanderScript as soon as a device is recognized, triggering the breakpoint. At this point, the CPU was halted after the "U-boot 2013.07 ..." string appeared on the console and before the "Hit keys to stop autoboot: 0" string.
Once we got into UBoot execution, we needed to find where the memory of Uboot was being remapped. This required us to identify an address in the newly remapped memory range to align to the memory dump we took earlier from the 0x73000000 address.
We leveraged the useful J-link "mem" command on the current instruction to print out 0x10 bytes of memory from the location of the program counter ($PC). The 0x10 bytes copied was chosen arbitrarily based on our goal of finding a large enough unique series of bytes that we could map to in the disassembler. Within IDA, we were able to use the “search for a sequence of bytes” (Alt+b) option to search for these 16 bytes of instructions. In general, the more bytes provided to this search, the better your odds of having a unique match.
As a result of our searching efforts, we then had context for where we were located in the original U-boot image, we were able to take the current program counter ($PC) address and subtract it from the location found in the U-boot dump. This provided us the offset to where U-boot was currently executing from, allowing us to remap our binary to match the physical device. Another valuable IDA feature is the ability to rebase the entire image based on a provided address – this is helpful with things like ASLR, where the image’s base address changes at runtime. By choosing “Edit->Segments->Rebase Program”, we supplied the calculated offset as the new image base.
Finally, we could leverage J-Link to place our breakpoint right after the printout of the string "Hit keys to stop autoboot: 0". Shortly after the string was printed, the “bootdelay” value was passed to a strtol() with the register R0 as shown in Figure 36. The system default value was little endian "0x3000", which is the hexadecimal value for ASCII “zero” – this was expected, as there was no boot delay (hence the point of this entire exercise!). The last step was replacing this value with "-1", or 0x312d, via a 2 byte write command “w2”. (Figure 36)
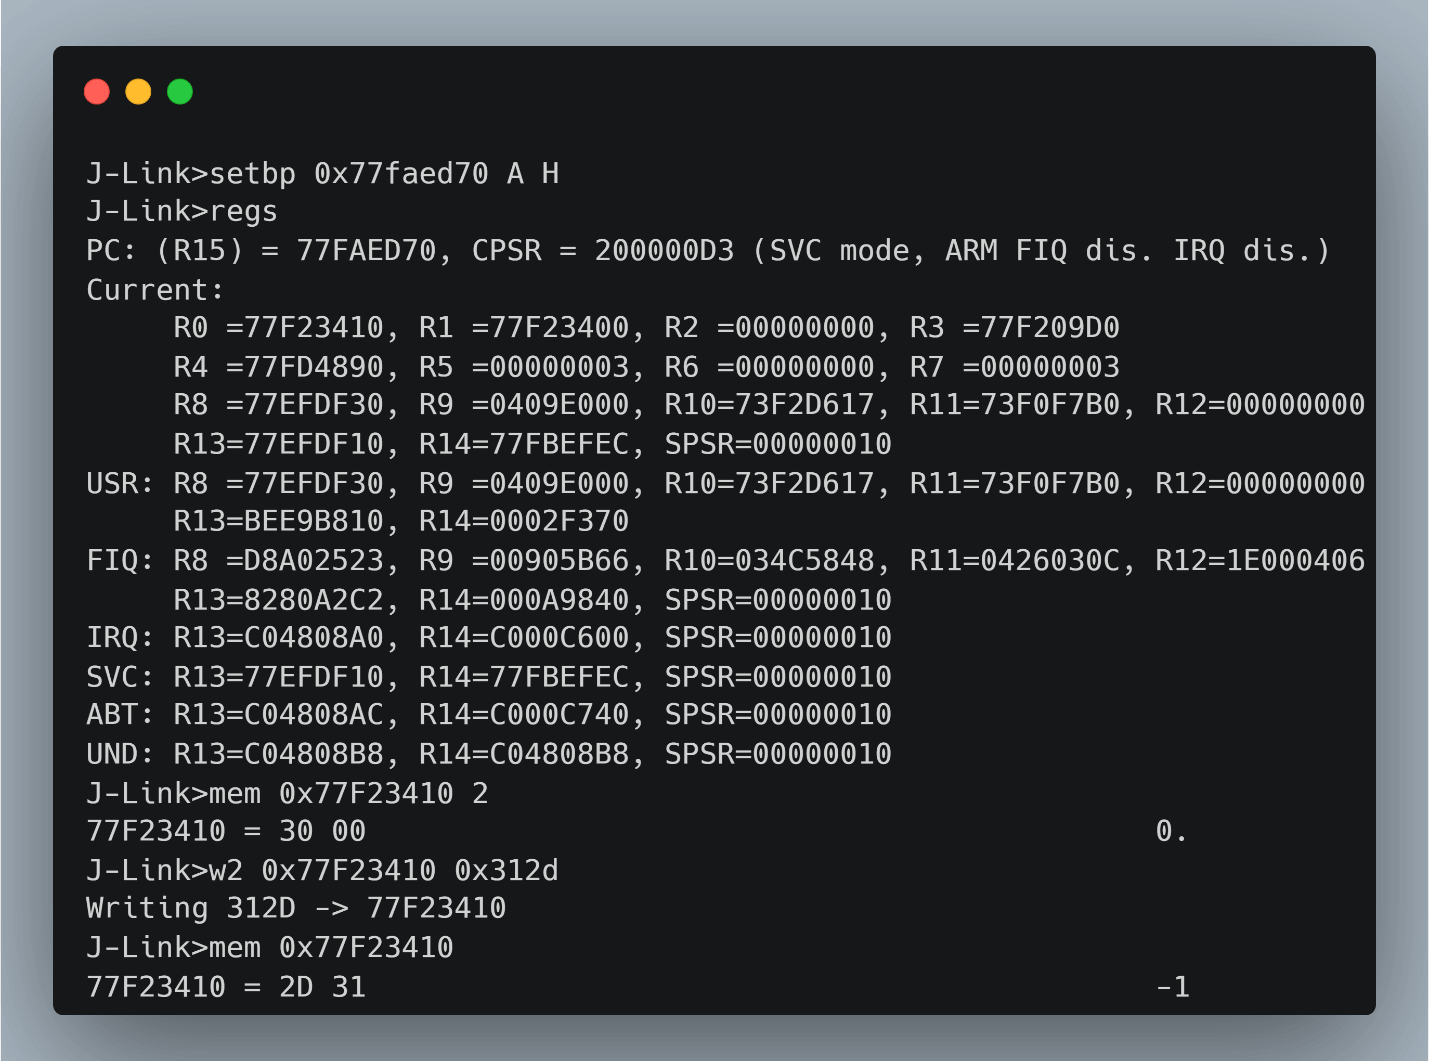
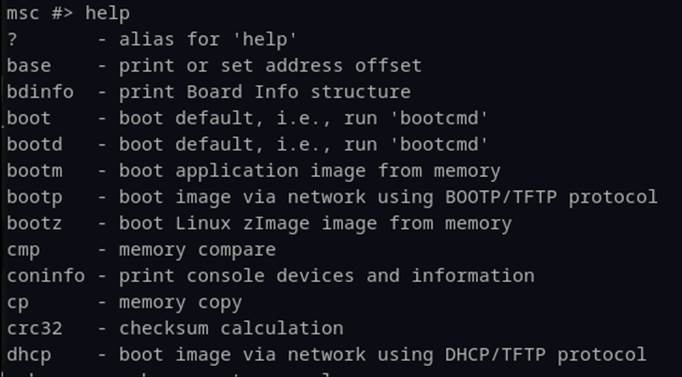
At this point the disabled U-boot shell was enabled again and continuing execution resulted in automatically dropping us into the U-boot shell. The “help” command from UBoot, shown in (Figure 37), illustrates this.
From the Uboot shell we now had to modify the device’s boot process. At this level, we could change parameters of how the Linux kernel was started, including what binary to use as “init” or PID 1. Since we were concerned that other system software might be responsible for disabling the UART console, we changed the init variable to “/bin/sh” as shown in Figure 38 temporarily overriding the initial startup script.
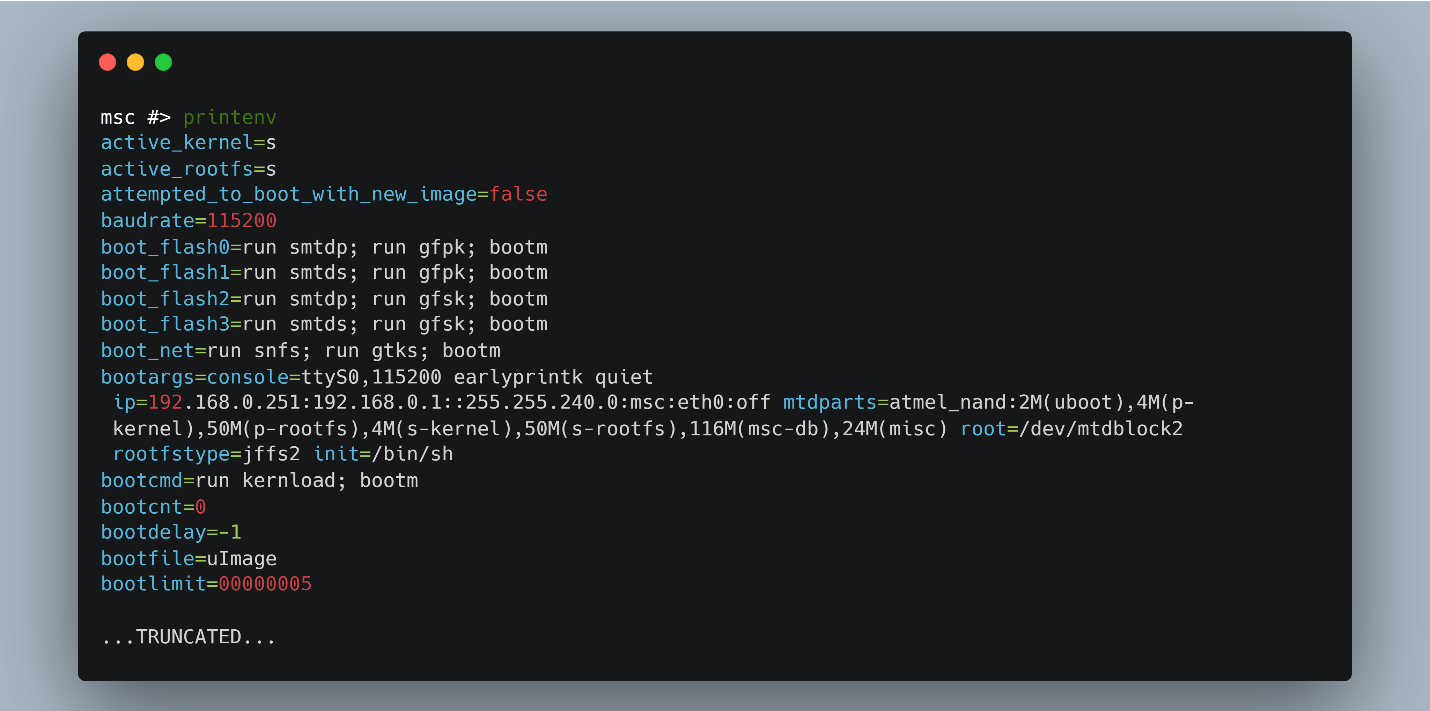
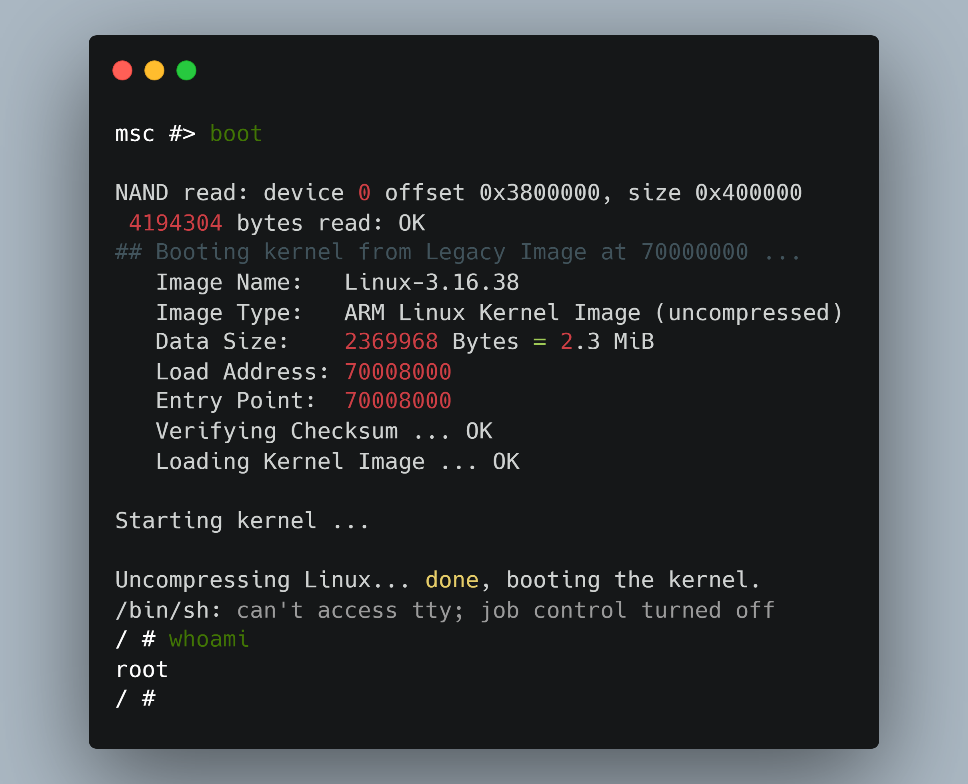
Having set the new init variable, any default init process that the system has setup will be overwritten (temporarily) and drop execution directly into the ‘sh’ binary, as specified. All we needed to do was call boot from Uboot and let our overwritten init take it from there. (Figure 39)
Root Shell Video Demo
Bringing everything full circle, you can see the results of these efforts in this short demo video resulting in a root shell.
Ok, that party got a little out of control, but we’re back.
As unbelievable as this sounds, we only now were finally ready to begin analyzing the firmware to look for vulnerabilities. Such is the life of the lonely hacker. Sorry to leave you with cliff hanger, but that is all for Part 1 of our technical blog series. Hopefully we have piqued your interest enough that you will join us next week on Thursday August 18th for Part II, where we will be recounting the process of looking for 0-day vulnerabilities! We will take a deep dive into the vulnerability discovery processes and show how several flawed development implementations led to major security problems – stay tuned!
This document and the information contained herein describes computer security research for educational purposes only and the convenience of Trellix customers. Trellix conducts research in accordance with its Vulnerability Reasonable Disclosure Policy. Any attempt to recreate part or all of the activities described is solely at the user’s risk, and neither Trellix nor its affiliates will bear any responsibility or liability.
Trellix is a trademark or registered trademark of Musarubra US LLC or its affiliates in the US and other countries. Other names and brands may me claimed as the property of others.
RECENT NEWS
-
Jun 17, 2025
Trellix Accelerates Organizational Cyber Resilience with Deepened AWS Integrations
-
Jun 10, 2025
Trellix Finds Threat Intelligence Gap Calls for Proactive Cybersecurity Strategy Implementation
-
May 12, 2025
CRN Recognizes Trellix Partner Program with 2025 Women of the Channel List
-
Apr 29, 2025
Trellix Details Surge in Cyber Activity Targeting United States, Telecom
-
Apr 29, 2025
Trellix Advances Intelligent Data Security to Combat Insider Threats and Enable Compliance
RECENT STORIES
Latest from our newsroom
Get the latest
Stay up to date with the latest cybersecurity trends, best practices, security vulnerabilities, and so much more.
Zero spam. Unsubscribe at any time.
